The Museum Blog
Category: Family Learning
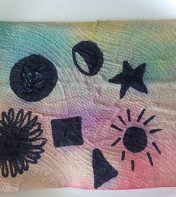
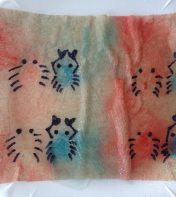
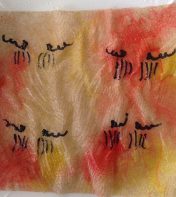
Wacky Art: Tin Foil Printmaking
By Meredith Brustlin, CMNH Educator
This printmaking is so fun and easy to do with materials you probably already have at home! The best part is it can be done over and over again with very little clean-up in between! Here’s how to get started:
Materials Needed:
- Piece of paperboard (like a cereal box) or cardboard, slightly bigger than an average piece of paper (10in X 12in-ish)
- Piece of aluminum foil that is large enough to cover the paper/cardboard. If needed, you can use two seperate pieces to cover the board
- Tape
- Acrylic or tempera paint
- Cardstock, printer, or construction paper
- A paintbrush
- Q-tips
- Paper towels or old kitchen rags
Directions (prep):
- Make your printing board
- Cut your piece of paper/cardboard to the appropriate size
- Cover with aluminum foil
- Fold the foil over the piece of cardboard and tape on the back so it does not move around
- Prep/gather paint, brushes, q-tips, paper towels, etc
Directions (activity):
- Drizzle a small amount of paint onto your printing board
- NOTE: Start with quite a small amount, you do not want too much paint on there for this activity--you can always add a bit more!
- Use the paintbrush to spread it out across the printboard so it is completely covered
- Use q-tips to quickly draw designs and pictures directly into the paint
- NOTE: Do this fast! Since you are using such a small amount of paint, it will dry quickly
- Place a piece of paper onto the painted printboard and gently press down
- Peel away to reveal your print!
- Use a damp paper towel to clean your printboard, dry it off, and try again!
Sheet Pan Pancakes
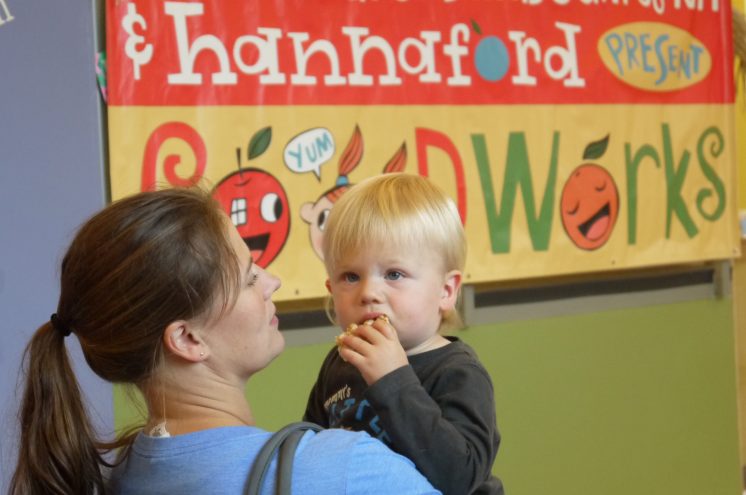
By Meredith Brustlin, CMNH Educator
Foodworks is such a fun program that we host at The Children’s Museum of New Hampshire. It promotes healthy eating, families cooking together, and delicious food that you can find at your neighborhood Hannaford!
I have to say, the recipe I’m sharing today is now a favorite of mine. It’s so awesome that I actually kept myself awake a little bit last night thinking about how excited I was to make it again in the morning...it’s true! There’s nothing NOT to like about it!
I am sharing sheet pan pancakes today. This recipe is a huge time saver, it’s an easy one for adults and children to create together, has lots of opportunities for food creativity, and is ready in about 20 minutes--no standing over the griddle for hours flipping flapjacks!
Here’s how to make your own!
First - gather your ingredients
- 2 cups pancake mix (I used Hannaford brand, obviously!)
- 1 cup milk
- 2 eggs
- 1 teaspoon vanilla extract
- Toppings!
- These are up to you! I used blueberries on one portion of my pancake and raspberries with chocolate chips on another--and left some plain!
- Also, I used frozen fruit for my toppings and it cooks up just fine, but feel free to use fresh or whatever you have on hand.
Directions:
- Preheat your oven to 425 degrees
- Prep your pan/pans by putting down a sheet of parchment paper and a quick spray of cooking oil.
- I used a 10 X 14 “jelly roll” pan. Just make sure it has edges and isn’t one of those flat cookie sheets. My pan made my pancake quite fluffy--which I loved! If you’d like your pancake a little flatter, use a slightly bigger pan.
- In a mixing bowl, add pancake mix, milk, eggs, and vanilla extract. Whisk together until smooth.
- Pour the batter onto your pan and spread it out evenly
- Add your toppings!
- Cooking time will vary depending on your oven and the thickness of your pancake. I set my timer for 7 minutes, checked it, and then set it for an additional 3 minutes. It can take anywhere between 5-15 minutes so stay close and keep checking!
More thoughts (I told you, I really like this recipe):
- I love that this recipe bakes the pancake instead of frying it. Not only does this cut down on the amount of oil used to create the recipe, it also cuts down on mess and clean-up! (And, I don’t know if it’s just me and my old house--but whenever we make pancakes on the stove, our house smells like burning pancake oil for ~48 hours---not the case with this recipe!)
- Instead of a normal pancake mixture that might only use water, this recipe adds in milk and eggs to give it a bit more protein.
- The toppings are so fun! You can really add whatever you want to this. I like that it can all be done in a single pan--so if the grown-ups are craving some blueberries and kids just want plain pancakes, it’s still all finished, warm, and ready to eat at the same time.
Thank you to Hannaford for sponsoring this great program! I hope you enjoy sheet pan pancakes!
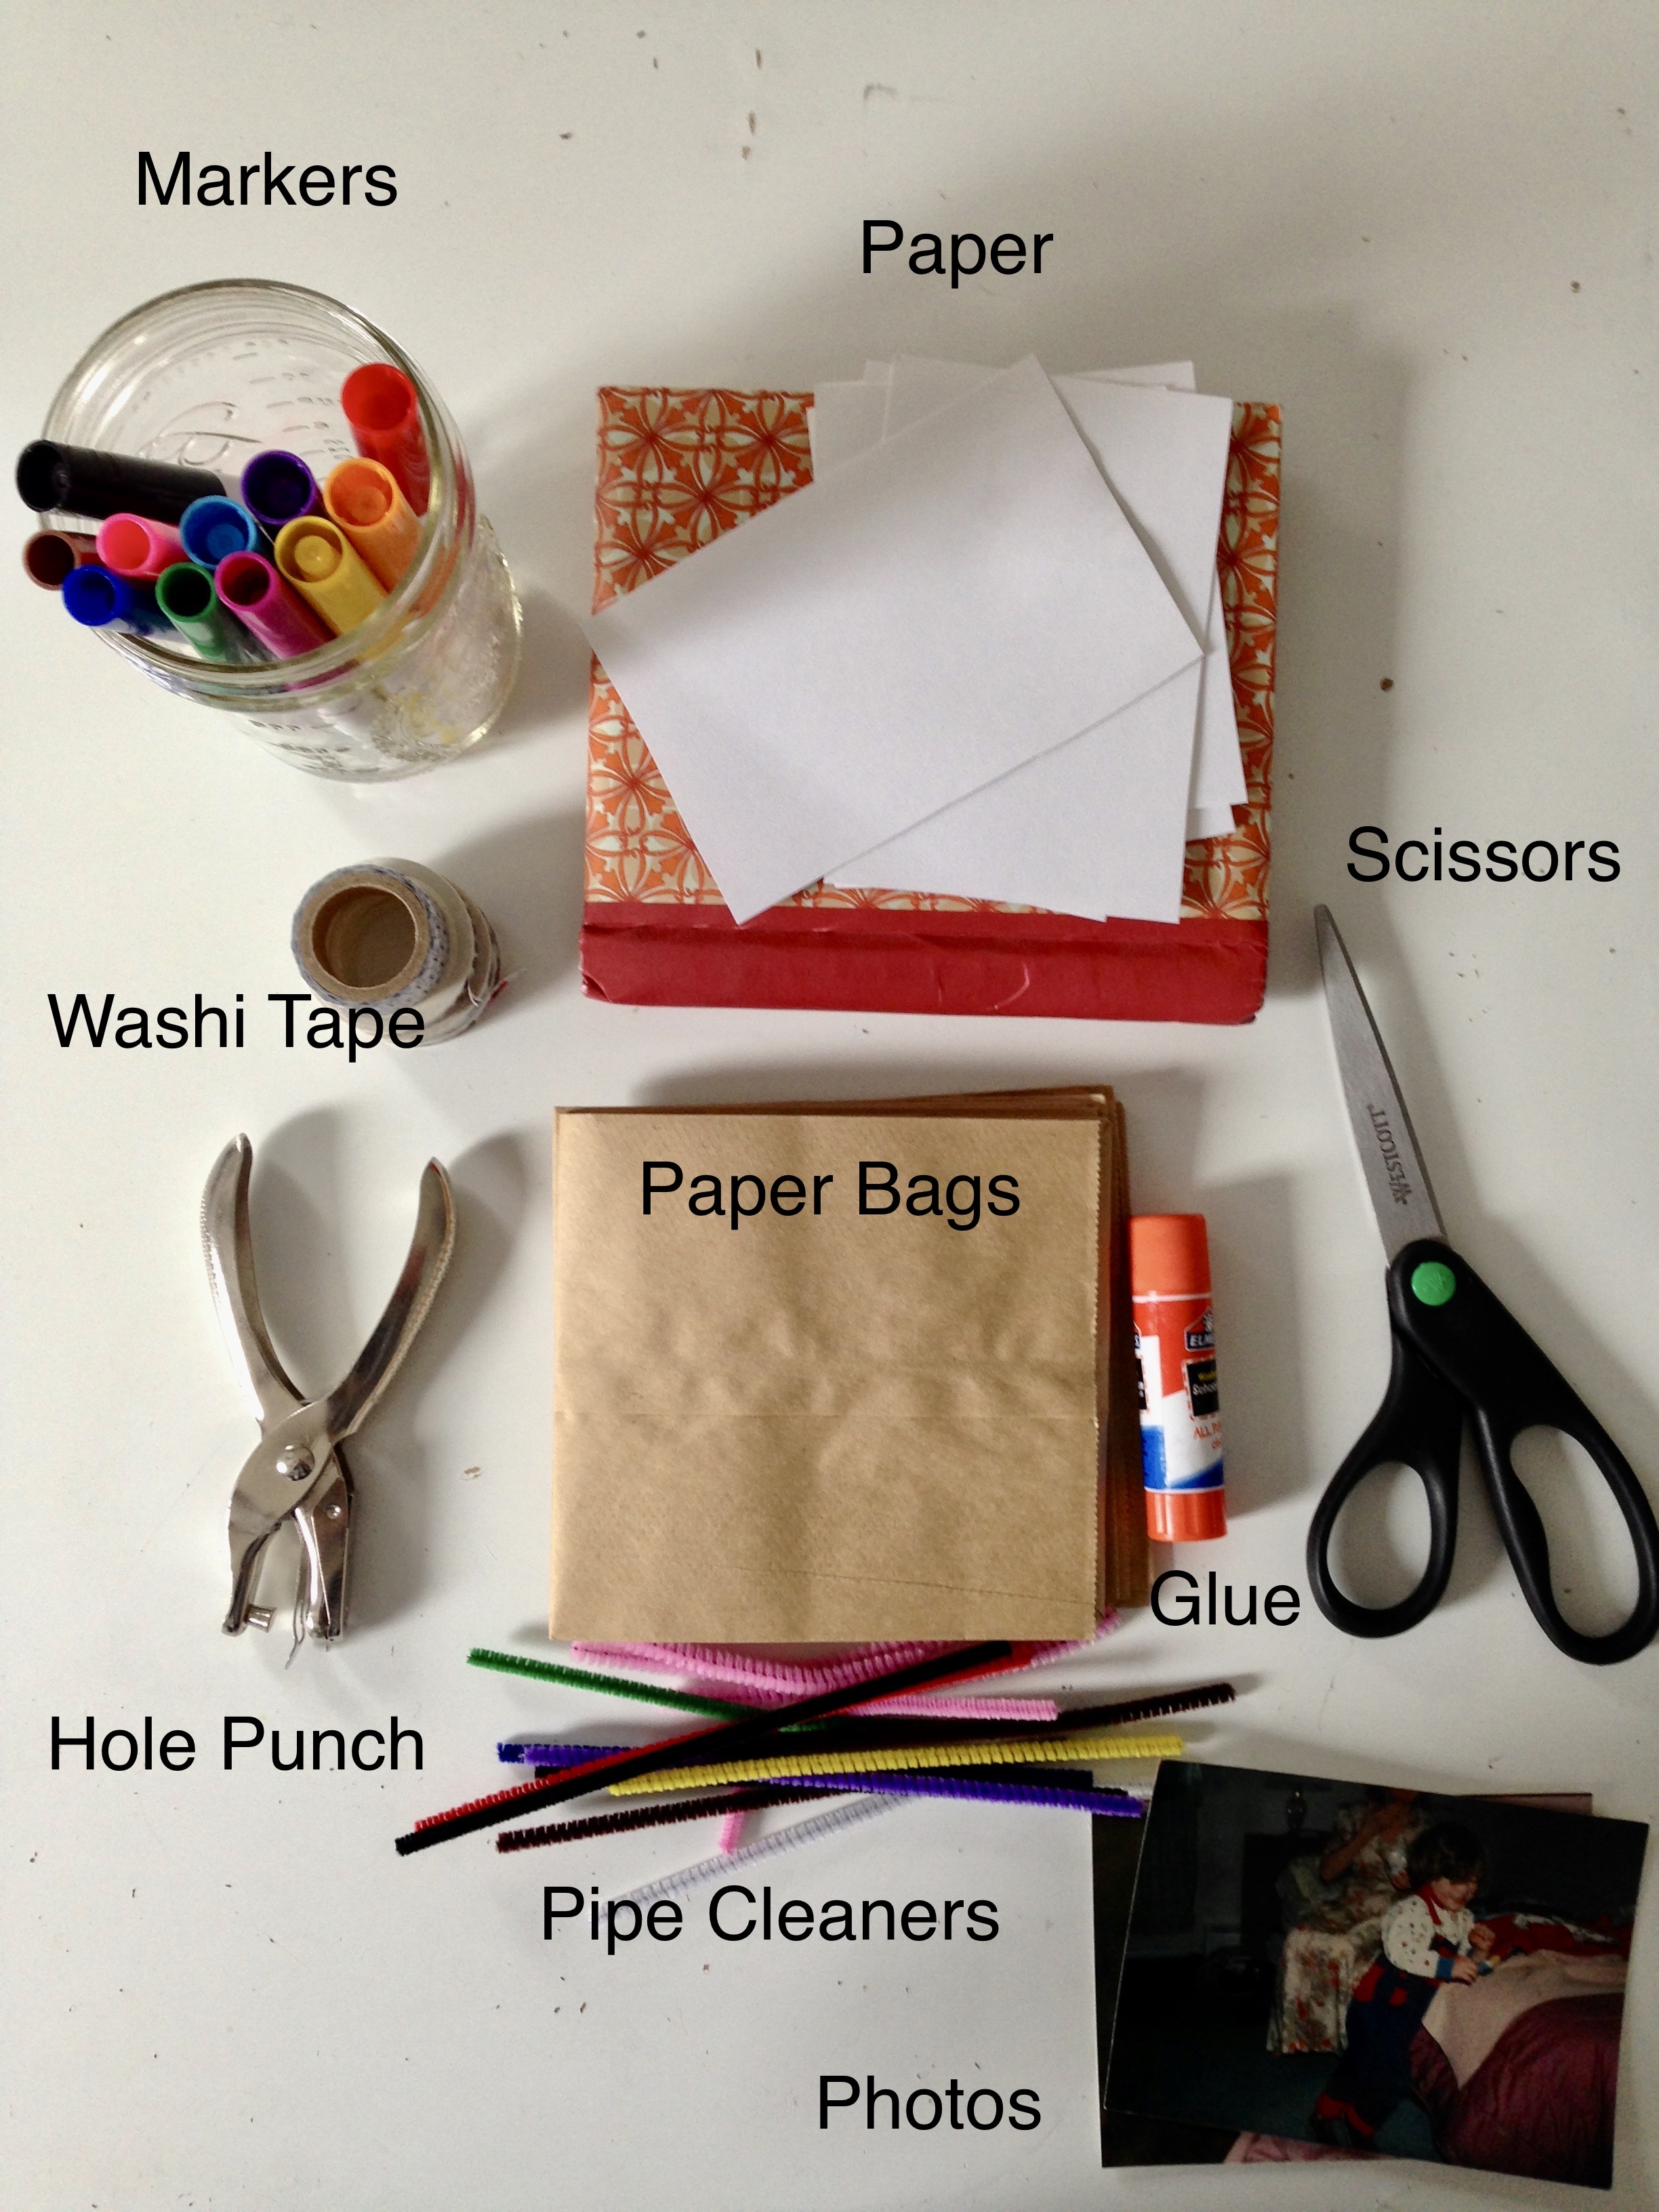
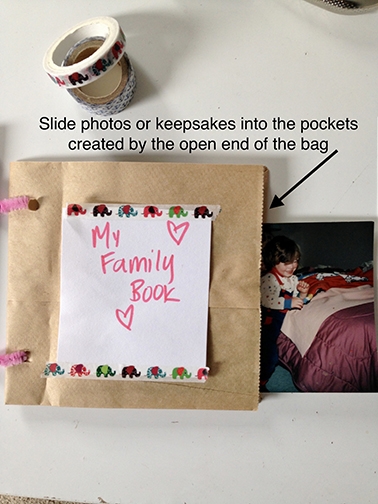
Paper Bag Mini Books
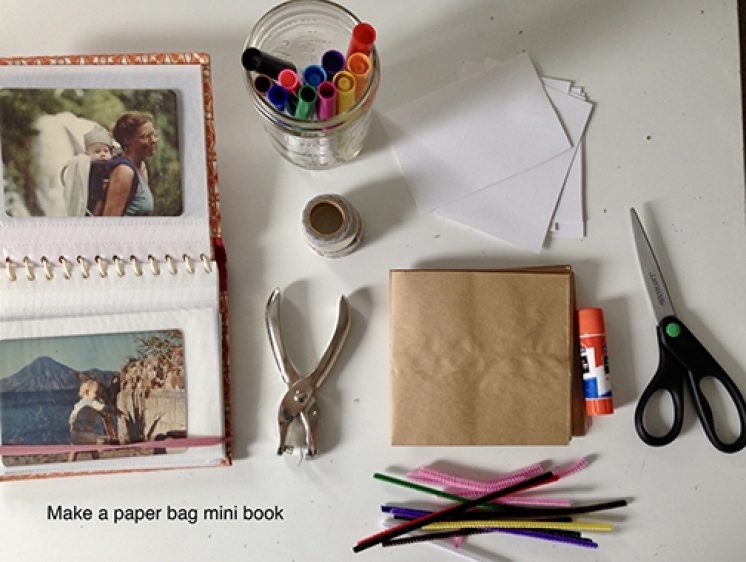
by Colie Haahr, CMNH Educator
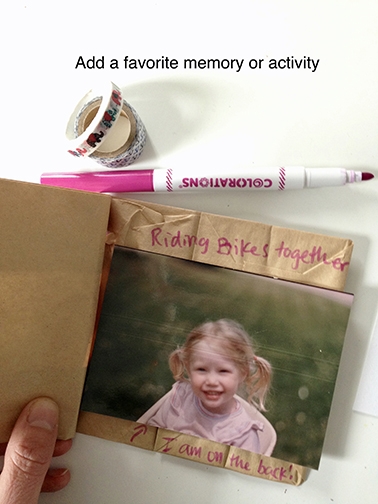
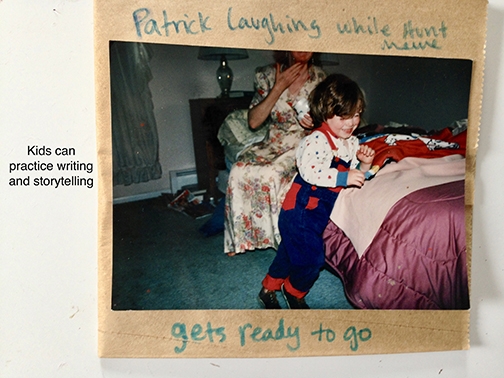
Make a mini paper bag scrapbook, nature journal, or keepsake! These books are fun for kids to put together, and the open end of the paper bag creates a pocket to store pictures, ticket stubs, or small items from a nature walk. Pipe cleaners make the book easy for kids to bind, and it’s easy to add more pages. String or binder rings can also be used to bind the book.
Use washi tape or glue to add photos, or print photos on copy paper so that kids can use a glue stick to add them. This also makes it easier to replace a photo if anything happens to it during the art making project. Kids can label photos, write favorite memories, or tell the story of each photo and have a grown up help with the writing part if needed.
Materials Needed:
- Markers
- Washi tape
- Glue stick
- Photos - printed on copy paper
- Scissors
- Paper
- Pipe cleaners
- Hole punch
- Paper bags
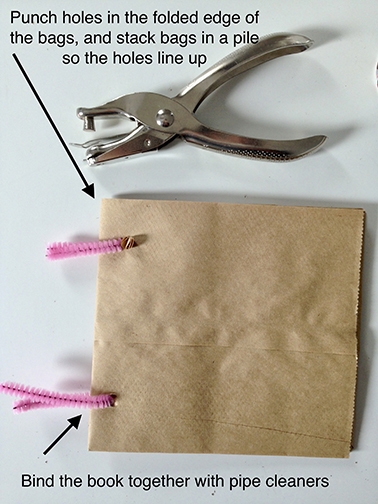
Directions:
- Fold the paper bags in half, and punch two holes in the folded end of the bags. It’s difficult to hole punch through more than one bag at a time, so be sure to line the holes up on each bag
- Stack several bags together so that the folded ends are together, and the holes line up
- Use the pipe cleaners to bind the book together by feeding it through the holes
- Twist up the pipe cleaners, and cut off any excess
- Start decorating and writing in your book! Use the glue stick to add photos or drawings on paper
- Use the open ends of the bags to create pockets for keepsakes or photos
- Theme ideas: nature journal, teacher gift, family book, share favorite family activities and memories, make up a story

Up-Cycled Planters
By Colie Haahr, CMNH Educator
This is an easy, low-mess art project that kids can work on independently. Use old containers and washi tape to make an “up-cycled” planter. What is up-cycling? It’s using materials that would otherwise be discarded to make something new. We do many up-cycling activities at the museum to help reduce waste, and to allow kids to be creative with their projects by challenging them to think of new uses for things.
This project provides a good opportunity to talk to kids about reducing waste, and some ways to do that at home. Up-cylcing is just one thing kids can do to help keep the earth healthy, and it’s a great way to cut down on art supplies and packaging if you are using things you already have. The book Not For Me, Please! I Choose to Act Green, by Maria Godsey, is a nice story to read with kids that shows them some concrete choices they can make to help reduce waste. We recently added this book to our collection at the museum.
This is also a great project if you would like to give someone a hand made gift without getting out paints or any messy supplies! You can use the planter to grow something from seeds, or you can use it to put a small houseplant inside.
Materials Needed:
- Empty play dough containers with lids
- Or: A different type of container that is safe to use
- Washi tape
- Optional: scissors
- A house plant, or soil and seeds for planting
Directions:
- The first step is to make sure the container you are using is safe to use and clean. Play dough containers work well. Be sure there are no sharp edges, and carefully supervise if you choose to use glass. Mason jars and other thick glass containers do not break easily
- If you are using a plastic container, you may opt to poke a hole in the bottom with scissors for drainage for your plant. This step should be done by an adult
- Use washi tape to decorate the outside of the container by carefully adding it one strip at a time
- If you want to plant something, add soil and plant the seeds according to the instructions on the seed package.
- If you want to add a houseplant that is already growing, carefully place it inside
- If you are using a play dough container, use the lid to catch extra water under the planter
- Ask: what three things do plants need to grow?? They need soil, sunlight, and water! Place your plant in a spot where it can get some sun, and be sure to water it!
There are more up-cycle project ideas on the museum’s Pinterest account:
Links:
Check out some of our Educator's Favorite Up-Cycle Projects over on Pinterest:
https://www.pinterest.com/kidmuseumnh/cmnh-educators-picks/upcycle-projects/
Blog post that inspired the planters:
First Friends: BIG and small
By Meredith Brustlin, CMNH Educator
Hello Song:
Hello it’s time to play
Let’s have some fun today!
Let’s clap our hands
And wiggle our toes
A hug...and a kiss...and away we go!
Hello (insert name here) it’s time to play
Hello (insert name here) it’s time to play
Hello (insert name here) it’s time to play
We’ll have so much fun...hooray!
Open Them/Shut Them (action song)
Open them, shut them
Open them, shut them
Give a little clap-clap-clap
Open them, shut them
Open them, shut them
Lay them in your lap-lap-lap
Creep them, creep them, creep them, creep them
Right up to your chin-chin-chin
Open up your little mouth…
But do not let them in!
Five Little Kittens (action rhyme)
Five little kittens standing in a row,
They nod their heads to the children so!
They run to the left,
They run to the right
They stand and stretch in the bright sunlight!
Along comes a dog who’s looking or some fun…
ME-OW! See those little kittens run!
Sugar Babies (action rhyme)
Roll, roll sugar babies
Roll, roll sugar babies
Push! Pull! Clap-clap-clap!
“ “
BIG! Little! Clap-clap-clap!
“ “
Up! Down! Clap-clap-clap!
The Royal Duke of York (bounce/movement rhyme)
The royal duke of york,
He had 10,000 men,
He marched them up the mountainside
And marched them down again!
Oh, when you’re up you’re up
And when you’re down you’re down
And when you’re only halfway up…
You’re neither up nor down!
Hurry, Scurry, Little Mouse (action rhyme/tickle)
Hurry, scurry, little mouse
Starts down at your toes…
Hurry, scurry, little mouse
Past your knees he goes...
Hurry, scurry, little mouse
Past where your tummy is…
Hurry, scurry, little mouse…
Gives you a mousey kiss!
Shake your shaker! (prop song)
If you’re happy and you know it, shake your shaker...one time! ONE!
If you’re happy and you know it, shake your shaker...two times! ONE! TWO!
If you’re happy and you know it, and you really want to show it
If you’re happy and you know it, shake your shaker...three times! ONE! TWO! THREE!
If you’re happy and you know it, shake your shaker...four times! ONE! TWO! THREE! FOUR!
If you’re happy and you know it, shake your shaker...five times! ONE! TWO! THREE! FOUR! FIVE!
If you’re happy and you know it, and you really want to show it
If you’re happy and you know it, shake your shaker!!!
Goodbye Rhyme (action rhyme)
This is big, big, big
And this is small, small, small
This is short, short, short
And this is tall, tall, tall!
This is fast, fast, fast
And this is slow, slow, slow
This is yes, yes, yes
And this is no, no, no
This is hi, hi, hi
And this is bye, bye, bye!
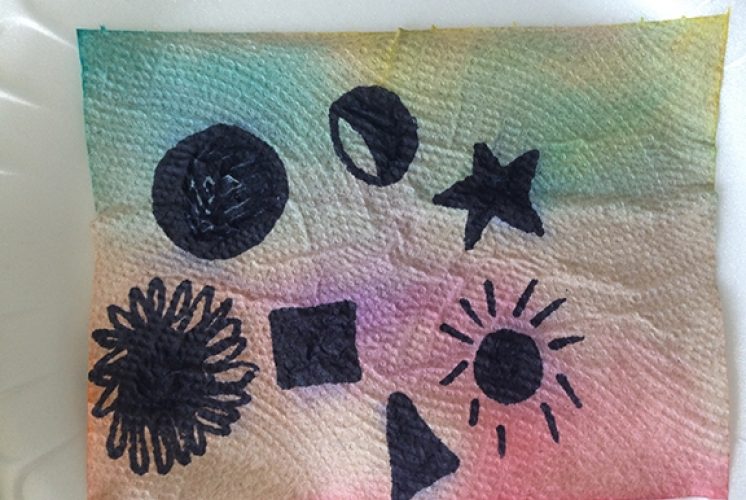
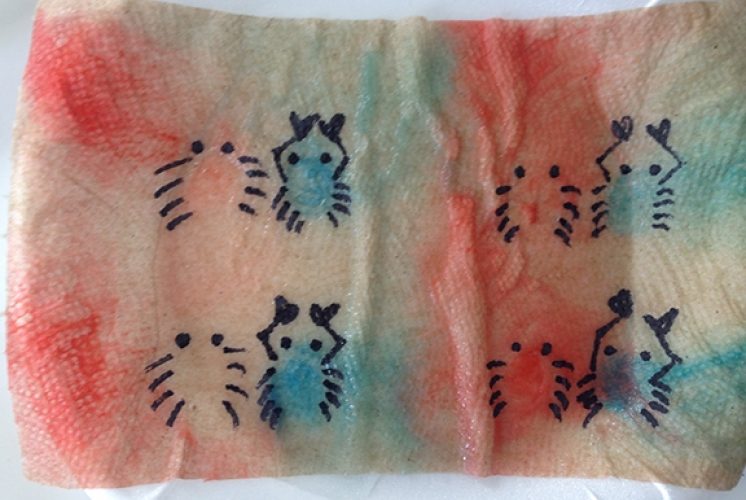
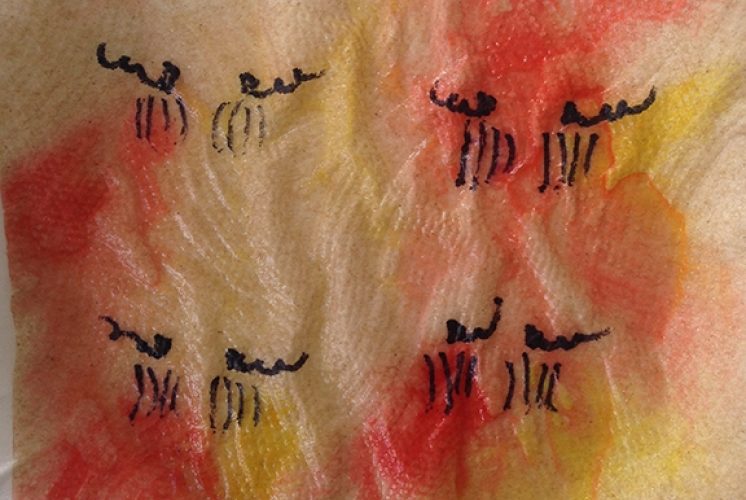
Science Magic: Secret Rainbow
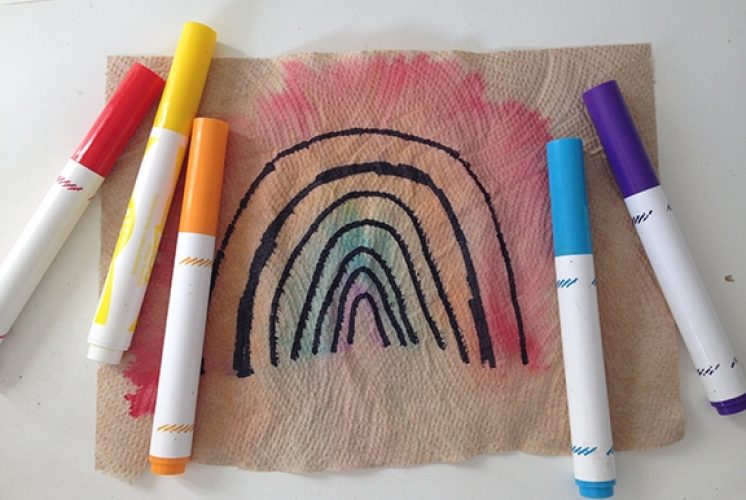
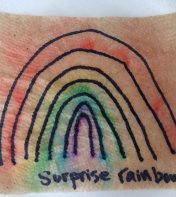
By Colie Haahr, CMNH Educator
This project is fun and easy, and only requires a little bit of prep ahead of time. Kids will enjoy magically making a rainbow appear by adding water to a paper towel. This activity is fun on its own, or it can be set up as an experiment that they can try a few times and record the results.
Materials Needed:
Paper towels
Washable markers
Black permanent marker
Cup for water
Tray or plates
Pipette, eye dropper, or small spray bottle
Optional: Different brands of markers, highlighter, permanent markers, pencil, pen
Directions:
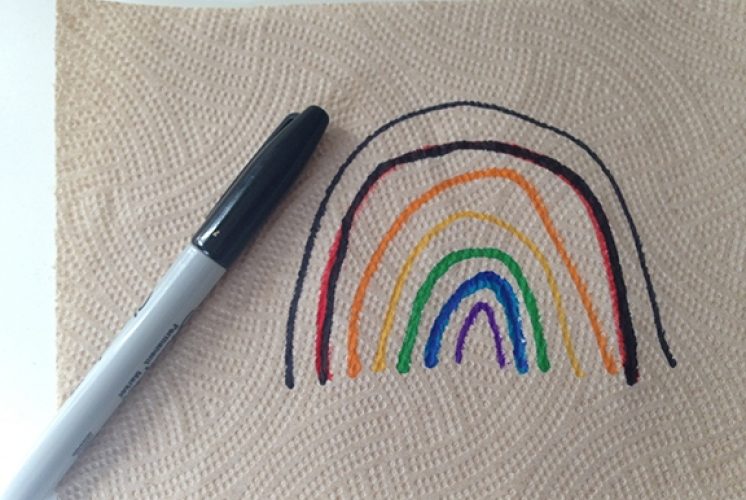
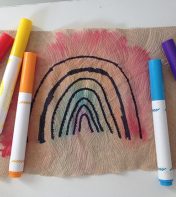
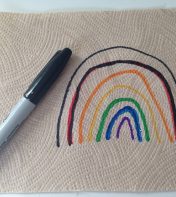
- Prep ahead: This project requires some prep ahead if you want to create a truly “secret” rainbow! You can create more sheets for kids to try as you go if they enjoy the activity! -Use a water based marker to create a rainbow on a paper towel. Remember ROYGBIV!
-Thin lines work well for this- do not make them too thick because you need to cover them with permanent marker
-Use a black permanent marker to carefully draw over each line, hiding the colorful lines under the dark lines.
-Optional: create shapes that are different colors, and use the same process to cover them with permanent markers.
-Optional: Set up the color mixing part of the activity the same way coloring two circles next to one another in primary colors (red and yellow, red and blue, and yellow and blue)
- Place one of the prepared paper towels onto a plate or tray that is okay to use for an art project (it may get marker ink on it!), with a cup of water and pipette or spray bottle
- Make a prediction- ask: what do you think will happen when we add water?
- Ask kids to slowly add some water to the picture
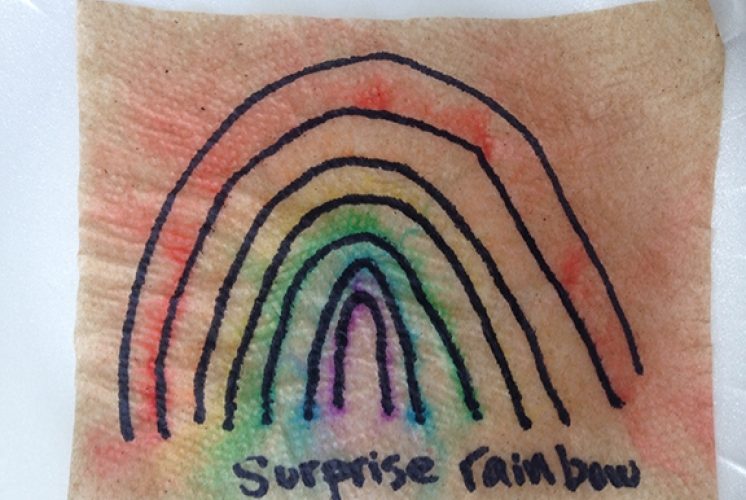
- The rainbow will “magically” appear when the water based marker dye spreads, and the permanent ink stays in place
- Try the same method with color mixing, or the colors hidden behind shapes
- Let the artwork dry completely, and some of the dye will stay on the paper towel once it dries. Too much water can cause the color to wash out completely
- Alternatives: This also works with a tray of water, and kids can carefully place the paper towel in the water and watch what happens.
-Make an experiment! To make this a true experiment, try using different types of writing utensils, like markers, pens, pencils, highlighters, etc., and testing each one to see if water changes anything. Compare different brands of markers to see which ones work the best. Make predictions and write down the results!
Science Information:
For this activity there were two types of markers used, and they were made of different types of dyes or inks. One was water soluble, and one was not. If the experiment went as planned, the water based markers should have spread color out on the paper towel. These markers have dye that is water soluble, which means that it is able to dissolve in water.
The permanent marker has a different kind of ink or dye, and it is not water soluble, which means that water will not wash it away. The permanent marker is alcohol based, so it will dissolve in alcohol. If rubbing alcohol were added to the paper towel, it may have changed the permanent marker, but because only water was added, the permanent marker stayed the same.
The paper towel also played an important part in making this activity work. This activity did not work well on other types of paper, like card stock and copy paper. Paper towels are absorbent, and designed to absorb or suck up liquids. If the paper were waxed paper or something similar, the water would bead up into droplets because water molecules like to stick together. Water molecules still like to stick together on paper towels, but there are tiny air pockets in paper towels, and a soft cellulose material that allows the water molecules to move around the paper towel together.
References:
https://indianapublicmedia.org/amomentofscience/how-do-paper-towels-absorb-water.php
https://www.thebestideasforkids.com/surprise-rainbow-activities/
Oil & Water Mixing Sensory Bottles
by Meredith Brustlin, CMNH Educator
There are so many fun experiments that you can try using oil and water. If you’re at the grocery store and thinking about picking up one or two items for your young scientist’s “at home chemistry station” I definitely recommend a big jug of vegetable oil. It’s inexpensive, easy to find, and can be used for tons of science!
This experiment does some simple MESS FREE oil and water mixing. I especially like this experiment because the experiment itself is quick and can be done over and over again. Some people also use these oil & water mixing bottles as sensory bottles - moving the oil back and forth and watching the gentle waves it makes can be very relaxing. Who doesn’t need a bit of extra relaxation these days?
Here’s how to make your own:
Materials needed:
- Small jar or container with a lid that can be securely screwed on (plastic or glass--although with very young scientists you may want to go the plastic route and duct tape that lid on there, too!)
- Vegetable oil
- Food coloring
Directions:
- Fill your container halfway with water
- Pour vegetable oil in to fill up the rest of the container
- Watch and see what happens!
- Add a drop of red or blue food coloring
- Watch closely again!
- Tightly secure the lid of your container
- Optional: add some duct tape to really seal it in place
- Watch as the oil and water in your bottles become completely separate and the drop of food coloring makes its way down to the water portion of the bottle - it will take a few seconds.
- Gently move the bottle around and watch the oil and water - they stay separate when moved gently
- SHAKE your bottle! Really shake it and watch as the water and oil temporarily mix
- What else happens?!
- Watch closely again as the oil and water slowly separate
The Science:
There are several different science “happenings” going on during this experiment.
Oil & Water:
- Your scientist’s will notice that the oil and water do not mix! The oil sits on top of the water and it always will. This is because water and oil are immiscible. Basically what this means is that water molecules only want to hang out with other water molecules and the same with oil molecules. The oil sits on top because it is less dense or less heavy than the water so it happily floats on top of it.
Primary/Secondary Colors:
- Vegetable oil is used for this experiment because it is yellow in color. If we used another kind of oil, like baby oil, you would have to purchase oil based food coloring which isn’t all that easy to find. The yellow vegetable oil automatically gives us one of our primary colors. Blue or red food coloring is added so that when you mix, you get a secondary color!
- There are lots of great books you can read/find videos of online to explore primary/secondary colors, check out:
- Mouse Paint by Ellen Stoll Walsh
- Mix It Up by Herve Tullet
- Monsters Love Colors by Mike Austin
- There are lots of great books you can read/find videos of online to explore primary/secondary colors, check out:
Science Magic: Glitter & Soap
by Colie Haahr, CMNH Educator
Try out this easy experiment with materials you already have at home! This experiment is about surface tension, and you can make glitter magically “dance” in a bowl of water! The reaction is quick, but kids love trying it more than once. This could be a good experiment to try before transitioning to water play, which always seems to be a hit!
Materials Needed:
Shallow bowls or plates
Water
Glitter, Pepper, Cinnamon, or All Spice
Toothpicks or Q-tips
Dish Soap
Toothpaste
Cooking Oil
Directions:
- Set up: Pour water into bowls, and place a very small amount of all of the other liquids into lids or small bowls. A pitcher of water is helpful to reset the experiment. The experiment works best with dish soap, but using a few other substances makes it more of a true experiment, where some will work and some will not.
- Optional: have a pencil and paper handy to record observations and hypotheses
- Pour about a teaspoon of glitter into one bowl of water, and a teaspoon of whatever spices you would like to use into another. You want the glitter and spices to cover the surface of the water
- Make an observation: what happened when we poured the glitter/spices into the bowl?
- The glitter or spices stay on the surface of the water because they are hydrophobic, and they do not dissolve in water like salt or sugar would.
- Carefully dip the end of a clean toothpick or Q-tip into the liquid dish soap, and poke it right into the center of the bowl
- Make an observation: What happened to the glitter/spices? The glitter should move quickly to the edges of the bowl when the soap touches it.
- Repeat the process with the toothpaste, cooking oil, hand soap or anything else you decide to try
- Optional: write down what happens each time you try the experiment
Science Information:
Water molecules like to stick together, so when you pour a drop of water onto something non-porous, like waxed paper, the water beads up. Kids usually can picture this happening on a windshield when it’s rainy the rain drops stick together and roll down the windshield.
When you pour water into a bowl or plate, this creates surface tension.
During the experiment, you observed that the glitter and spices in the water bowls stayed right on top. Even though water molecules like to stick together, they do not always stick to other things, like the glitter and spices. The surface tension of the water allows these small particles to float on top! They do not dissolve, and usually, they do not get saturated and sink.
When you added different substances to the water, some caused the glitter and spices to move away to the sides of the bowl. Now experiments can be tricky, and they do not always work perfectly, but the oil should have made no changes to the water bowl, and the soap and toothpaste should have caused the particles to move. The substances that made the glitter and spices had something in common: they all clean things!
Dish soap should have worked the best, and this is partially because dish soap has molecules (teeny tiny parts) that are BOTH hydrophobic and hydrophilic. Wait, that would mean the soap molecules repel water molecules, and attract or bond to them! This is true, soap is a good cleaner because it can pull things like oil out of water because of the hydrophilic properties, like when we wash dishes, dish soap helps to get rid of grease and oil that water alone can’t remove.
When the soap touched the water bowl, it broke the surface tension of the water, and that’s why we could see the glitter and spices move. Soaps and cleaners are designed to break down the surface tension of water. This helps make them good cleaning tools. When you added the dish soap or toothpaste to the water it broke up the surface tension. The water molecules, however, want to stick together and maintain that tension, so they move away from the soap, carrying the glitter and spices with them! We can see the reaction because there are particles floating on the top of the water. The water would still move when soap is added, but because it is clear, we can’t see it. The glitter and spices help us see what’s happening in the water bowl!