The Museum Blog
Category: Learning
Witchway Games & Eric Streed
Q&A with Artist and Game Designer Eric Streed
Q. How do you start making board games?=
A. I would start by playing lots of different board games! Find out what kind of games you like, and what about those games you enjoy. Is it the theme? Do you like drafting cards? Do you like worker placement? What parts of those game maximize on that sort or play?
After you’ve started thinking about those questions, start small. Make an “expansion” to a game you already know and love. Change a rules set, or get some cheap custom cards made for it. See how the rules you change or the elements you implement add to or subtract from the game.
Game design is a skill that takes practice to get better at, your first game is not going to be perfect. Instead of perfect, focus on “Done”. The artist Jake Parker spreads the message “finished, not perfect”. This idea encourages to complete a project, and then start the next one and make it even better. Consider the table presence of the game you want to make, think of that peak moment you want to give a player, and build towards that.
Q. How did you start making board games?
A. I went to school for art, focusing on video game design. I worked for animation studios and on independent video games for a while but found the process slow and unfulfilling. I ended up co-founding a small company a few years after college and got involved making board games and immediately saw a shift. I could quickly hold my game in my hands and play it with other people. The efficiency, community, and tactile nature of board and card games really rekindled my love of game design.
Q. What is the hardest part of making board games?
A. For me the hardest part of game design is iterating. I get an idea, work with people to iron out the details, do the art for the game, get a prototype made up, and start playtesting, only to start finding issues in the design. This is a super normal part of the design process, no game is going to work perfectly right out the gate. This is the piece of the puzzle that gets very granular though, where you are fiddling with numbers, changing rules occasionally, altering the setup and win conditions. This is a crucial piece of the design process, but its also challenging as it also takes the most time.
Q. What resources are there out there for aspiring board game designers?
A. There are lots of great resources for game designers out there! There are social media groups, there are cheap game design kits available online, I’ve even hand cut cards and drawn on them for perfectly functional prototypes. After you have spent a little time making some handmade prototypes or printing some small assets for an expansion to a game you like, using a company like The Game Crafter is a great way to step up your designs and create some really beautiful production quality copies of your game.
FoodWorks: Healthy Frozen Treats
Foodworks is such a fun program that we host at The Children’s Museum of New Hampshire. It promotes healthy eating, families cooking together, and delicious food that you can find at your neighborhood Hannaford!
Today we are sharing two recipes for summer time treats: Frozen Yogurt Bark and Frozen Watermelon Popsicles. Both recipes are easy to make, and are perfect cold treats for hot summer days! Summer is a great time to enjoy ice cream and popsicles, but these two recipes offer a slightly lower sugar and lower fat way to enjoy a cold dessert, and could easily be added to your summer frozen dessert routine, which we all need when it's this hot outside!
Both of these recipes only require a freezer to complete, and both are kid-friendly, so if you have eager kitchen helpers in your family, this is a great way to include everyone in some no fail cooking fun. Also, you do not need popsicle molds to make the Watermelon Popsicles!
If you want to try both recipes, it may be easier to make the yogurt bark first because the watermelon can get messy, and may be easiest to do outside. If you opt to use cookie cutters for the watermelon recipe it results in some extra pieces that need to be eaten, so this activity can double as a snack time.
First - gather your ingredients
For the frozen watermelon popsicles:
- Watermelon- If you need a smaller portion, try the pre-cut watermelon at Hannaford
Skewers, chopsticks, or popsicle sticks - Cookie cutters
For the yogurt bark:
- Plain yogurt
- Vanilla yogurt
- Optional: coconut or soy based yogurt
Optional toppings:
- Berries
- Granola
- Chocolate Chips
- Jam
- Cereal
For both:
- Wax paper
- Pan or tray
- Freezer space
Yogurt Bark Directions:
- Prep your pan or tray by putting down a sheet of waxed paper and a quick spray of cooking oil.
- In a mixing bowl, combine 1 cup of plain and 1 cup of vanilla yogurt to create a lower sugar, kid-friendly version of the bark, or simply choose a yogurt flavor you know your family will enjoy
- Add in any toppings you would like to add
- You can add the toppings to the yogurt once it’s on the tray if you would like to make some bark with toppings, and some plain
- Use a spoon or spatula to carefully add the yogurt to the waxed paper on the tray
- Place the tray in the freezer for about 4 hours or overnight
- Break up the bark to serve. You can save it in a freezer safe container.
Notes: we tried making the bark with soy based yogurt, and coconut based yogurt, both froze well, and were easy to break up and serve. We used Greek yogurt, and it made a tart treat, but be sure to use any yogurt that your family prefers. The Greek yogurt was nice and thick, so it froze well, but any yogurt should work! Please keep in mind that some of the toppings, like the berries, may create a greater risk of choking when frozen, so be sure to supervise as needed. Recipe inspired by Stonyfield Yogurt: Stonyfield Yogurt Bark Recipe
Frozen Watermelon Popsicle Directions:
- Prep a pan or tray with waxed paper
- Cut watermelon into slices- about the same thickness as you would serve to eat fresh
- If children are helping, set each person up with a work station- a cutting board or tray with waxed paper works well
- Use cookie cutters to press the watermelon into desired shape (we made stars, triangles, and circles), and remove seeds with a skewer or toothpick
- Carefully add a stick using a skewer (can be sharp), chopstick, or popsicle stick
- Place each popsicle on the lined tray and place in the freezer
- The extra watermelon scraps can be eaten as snack
- Serve any time you want a healthy refreshing treat!
Notes: This may be the easiest recipe ever aside from a little messy watermelon juice. Creating shapes with cookie cutters is completely optional- you can simply put the watermelon onto the skewer with the rind if you would like. The texture of the watermelon works really well as a frozen treat! It is very similar to the texture of an ice pop- easy to take a bite, though quite cold when it first comes out the freezer. If you opt to use popsicle sticks, use the wooden, un-dyed sticks. Colorful craft sticks tend to bleed the dye when wet, and it may not be food safe! We experimented with adding some melted chocolate chips over a few of the watermelon slices, and it tasted great, but was just a little messier to eat. Recipe reference: https://www.chopchopfamily.org/recipe/frozen-watermelon-popsicles/
We hope you enjoy these refreshing summer treats, and stay cool! Thank you to Hannaford for sponsoring our Foodworks program at CMNH!
First Friends at Home: Our Favorites!
By Meredith Brustlin, CMNH Educator
This week I shared some tried and true Baby Storytime favorites! I hope you enjoy!!
Hello Song:
Hello it’s time to play
Let’s have some fun today!
Let’s clap our hands
And wiggle our toes
A hug...and a kiss...and away we go!
Hello (insert name here) it’s time to play
We’ll have so much fun...hooray!
Open Them/Shut Them (action song)
Open them, shut them
Open them, shut them
Give a little clap-clap-clap
Open them, shut them
Open them, shut them
Lay them in your lap-lap-lap
Creep them, creep them, creep them, creep them
Right up to your chin-chin-chin
Open up your little mouth…
But do not let them in!
Sugar Babies (action rhyme)
Roll, roll sugar babies
Roll, roll sugar babies
Push! Pull! Clap-clap-clap!
“ “
Hot! Cold! Clap-clap-clap!
“ “
Up! Down! Clap-clap-clap!
Little Bird (action song/bounce)
Tune: Twinkle, Twinkle Little Star
I saw a little bird go hop-hop-hop
I asked that little bird to stop-stop-stop
I went to the window to say: How do you do?
He wagged his little tail at me and away he flew!
Popcorn (bounce)
Popcorn, Popcorn
Sizzling in the pan
Shake it up, shake it up
Bam! Bam! Bam!
Popcorn, Popcorn
Now it’s getting hot
Shake it up, shake it up
Pop! Pop! Pop!
Colors in the Air (prop song)
Colors, colors
Colors, colors
Floating in the air!
Floating in the air!
Red, Orange, Yellow
Green, Blue, Purple
Floating in the air!
Floating in the air!
Goodbye Rhyme (action rhyme)
This is big, big, big
And this is small, small, small
This is short, short, short
And this is tall, tall, tall!
This is fast, fast, fast
And this is slow, slow, slow
This is yes, yes, yes
And this is no, no, no
This is hi, hi, hi
And this is bye, bye, bye!
Wacky Art: Windsock Craft
By Meredith Brustlin, CMNH Educator
I love this windsock craft! It’s an art project that is accessible to all ages and abilities - and you get to sneak in a little bit of science. Here’s how to make your own windsock:
Materials Needed:
- Paper (printer paper, cardstock, construction paper, etc)
- Markers or crayons
- Crepe paper streamers or tissue paper cut into long strips
- Tape or glue
- A stapler
- A hole punch or scissors
- String or yarn
Directions:
- Invite little ones to decorate their piece of paper with the markers or crayons. If you have stickers or stamps, you could use those, too!
- Once their paper is all decorated, flip it over so that you are looking at the back
- Tape or glue the streamers onto the bottom end of the paper
- If you used glue, give it a few minutes to dry
- Pick up the paper and curl it into a tube/windsock shape
- Staple on the top and the bottom
- Hole punch or cut small holes on either side of the top
- Put your string through the holes
- Hang up your windsock!
The Science:
- The science behind windsocks is pretty simple...if you put your windsock outside, you’ll be able to tell a few things:
- If the wind is blowing
- How much the wind is blowing
- Which direction the wind is coming from!
Marching to Your Own Beat: Books for Cool Kids & Parents
by Taylore Kelly, CMNH Graphic Designer and Communications Specialist
If you and your children march to the beat of a different drummer, have we got a list of picture books for you. After much research and a lot of fun, we came up with ten books that speak to the modern inner rebel, artist, musician, and trickster. Each story is filled with messages for big and small people and poignant art.
My Dad Used to Be So Cool, by Keith Negley
This is a very thought-provoking, moving book about a boy who sees hints of his father’s former life. Rock-bands and motorcycles! Who knew Dad used to be so cool!? The story is combined with many colorful and vibrant illustrations and will resonate with all, the young, the middle, and the old(er).
Urban Babies Wear Black, by Nathalie Dion
First off this book has amazing, stylish art by Nathalie Dion. The truth MAY be that no child will REALLY identify with this book in words, however if parents enjoy reading this board book, the baby will appreciate the effort. The message may appear to be that urban babies do all sorts of cool things, but what comes across is that the babies in this book do things with their parents, and that's what makes them the coolest!
Tell Me a Tattoo Story, by Alison McGhee & Elizabeth Wheeler
This is a beautiful story about a father sharing his life stories, and memories with his son. But instead of flipping through a photo album together, we see his life and loves come alive in his description of his tattoos - a statement of family love. It dispels the myth that only certain types of people have tattoos. It’s a love story you won’t regret reading.
What is Punk, by Eric Morse and Anny Yi
This little diddy is a pop-culture primer. The history of punk rock is told in clever rhyming that will delight little readers and amuse parents. Anny Yi's phenomenal 3D-clay illustrations are pure perfection and bring this world to life. Readers of all ages will have so much fun. You can read this in less than 5 minutes, to your child and, maybe, play the music! Teach 'em young!
Where's Warhol, by Catharine Ingram and Andrew Rae
This beautiful and fun book shares art history and pop culture! Instead of trying to spot "Waldo" you get to try to spot Warhol and friends. In the process, discover figures such as artist Rachel Whiteread, potter Josiah Wedgwood, novelist Gustave Flaubert and architect/designer Walter Gropius who appear alongside the likes of rappers The Beastie Boys, actor John Travolta, singer Madonna, and even Yoko Ono and John Lennon!
The Book With No Pictures by B.J. Novak
If there is one thing kids like even better than pictures, it’s nonsense words. Hearing nonsense words read aloud by your parents is top tier! We had a hard time not collapsing into fits of giggles and barely made it past “a hippo named Boo Boo Butt”.
Goodnight Darth Vader, by Jeffrey Brown
There are really no words actually needed to describe this book, BUT this whimsical bed time romp through everyone’s favorite space fantasy highlight’s superb artistic talents & goofy sensibilities. This makes a great bedtime treat for any Star Wars devotee.
Goodnight iPad: a Parody for the Next Generation, by Ann Droyd
This short, sweet book highlights our dependence on technology and the usefulness of knowing when to put it down. This closely follows the cadence, rhyme, and illustrated scene sequencing of the original "Goodnight Moon", by Margaret Wise Brown. However, it makes serious fun of our addictions to bright, noisy, digital media. This book will hit a home run with parents of school-aged kids today!
Triangle, by Mac Barnett and Jon Klasen
This book brings a quirky, clever tale to life. It’s a silly story about friends playing tricks on each other. A truly fun and simple story that will connect with kids, but also have adults smiling at the antics and conclusion.
Beware of the Frog, by William Bee
A great picture book for older kids perhaps as this story starts out very sweet, but has some twists along the way and a surprise ending! It’s the twists and turns that make this story great! A perfect blend of sweet and funny. Great illustrations and a hiding snail to find on each page!
Wacky Art: Raised Salt Paintings
By Colie Haahr, CMNH Educator
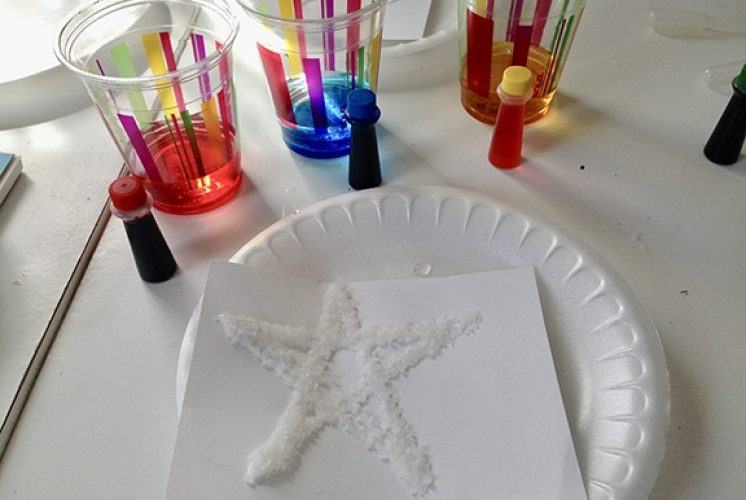
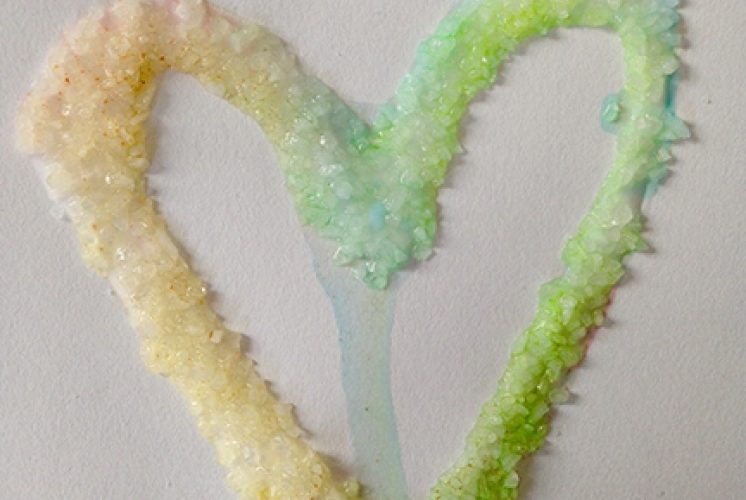
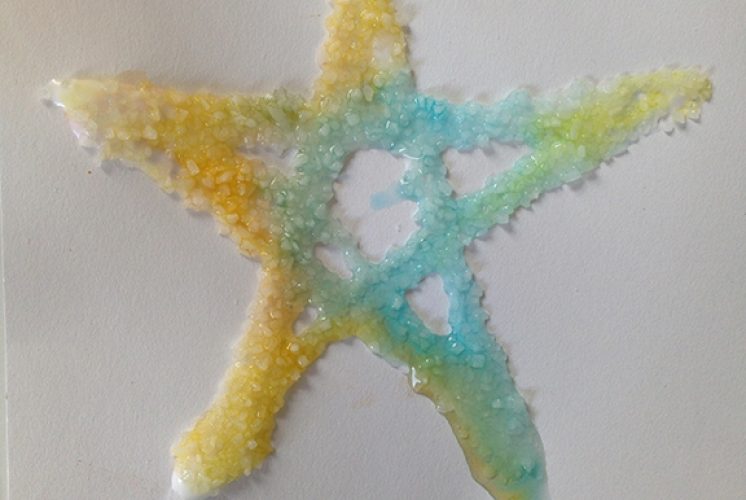
This fun art project can double as a science project! Kids make designs with liquid glue, add salt, then carefully add some colors and watch what happens! The liquid water colors should be absorbed by the salt, and move along the glue and salt design right before your eyes!
Materials Needed:
- Card stock or thick paper, construction paper works
- Tray or plate work surface
- Salt in a dish with a spoon to scoop it
- Liquid glue - that kids can use on their own
- Liquid watercolors or food coloring mixed with water
- Pipette, eye dropper, or spoon
Directions:
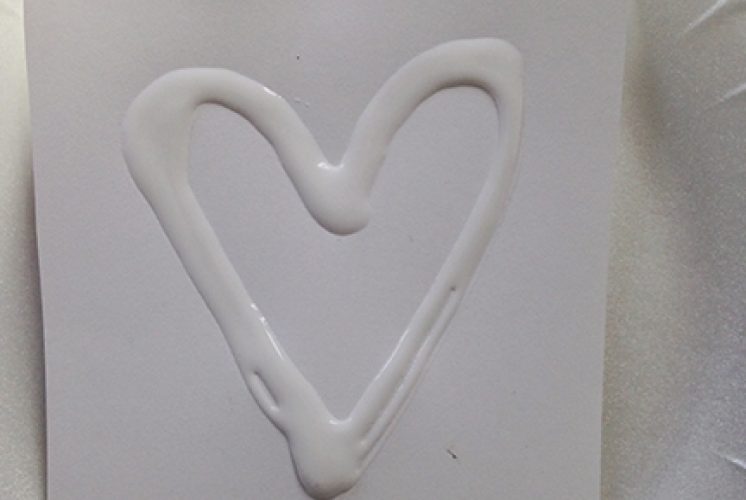
- First, make a design on the cardstock using only glue- lines work well!
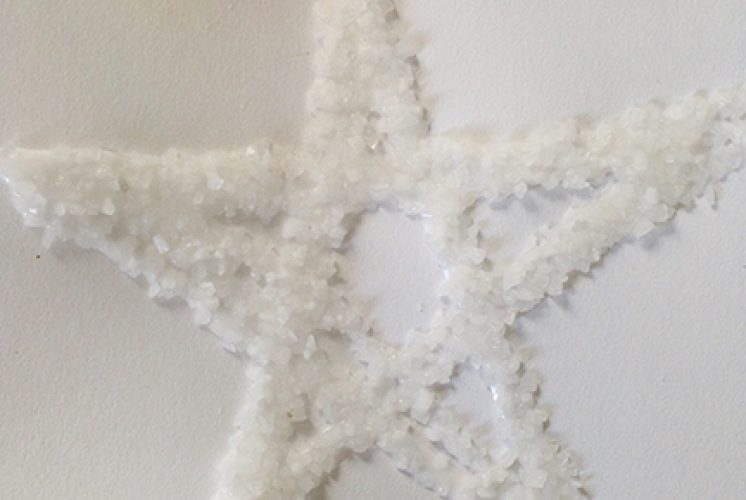
- Next, add salt to the glue so that the glue design is covered in salt. Gently pour the extra salt back onto your tray or into the trash. Similar to what you would do with glitter and glue- you want the salt covering all of the glue
- Use the pipette to carefully add colors to your design. Only add a little bit of color at a time so you can see the colors move. Only add color to the glue.
- The color should magically spread on your design as the salt absorbs the liquid
- Let your project lie flat to dry, otherwise the colors will spread where there is no glue!
Experiment:
- Here are a few ideas you can try to make this art project into an experiment:
- Try using different kinds of salt, and see which kind works best (larger or smaller grains). Make a prediction before you try each one!
- Try this project with sugar and with salt (use the same design for each), and see which works better, or if sugar works at all.
- Try color mixing by using primary colors to do the project. Can you get them to mix? Why or why not?
Links:
www.cbc.ca/parents/play/view/art-science-salt-glue-watercolour-experiment
Walking Rainbow Experiment
By Meredith Brustlin, CMNH Educator
We share a lot of different science experiment projects at CMNH. Many of these experiments have instant results - things like vinegar and baking soda bubbling, popcorn dancing, and invisible ink appearing. What I really like about this “walking rainbow” experiment is that it takes some time to see the results (as in, it takes hours to fully see the results!) Although it may not be as exciting in the moment, it is a perfect experiment to practice making predictions and thinking like a scientist. It really gives young scientists time to think and hypothesize and even change their guesses throughout the day.
To make your own rainbow you will need:
- 7 clear cups--these can be glass or plastic, just make sure they are perfectly clear (not colorful)
- Water
- 6 paper towel pieces (this could be three large sheets cut in half, or 6 of the little half sheets)
- Primary colors of food coloring or liquid watercolor
Set-up:
- Set out the 7 cups in a line
- Fill cups 1, 3, 5, & 7 about halfway with water
- Leave cups 2, 4, & 6 empty
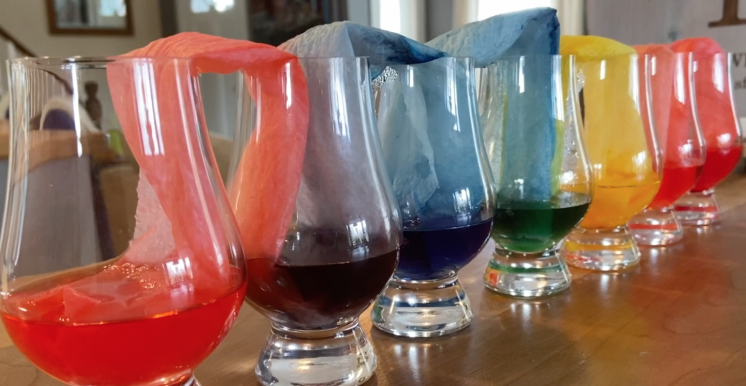
- Fold your six paper towel pieces in half lengthwise and then in half again. Take that long skinny strip and fold it in half so that it can stand up in the cups (pictured above)
- Invite young scientists to help you add some food coloring to the cups.
- Ask them--what is the first color of the rainbow? Red! Add about 6 drops of red food coloring to the first cup.
- What is the second color? Orange! That cup is empty though, so we will skip that one.
- Add yellow to the 3rd cup
- Skip the 4th cup (green)
- Add blue to the 5th cup
- Skip the 6th cup (purple)
- Add red to the 7th cup and ask your scientists why they think you may have done that…!
- Next, carefully place your paper towel pieces in between each cup so that they are resting in the colorful water.
That’s it for set up! Now it’s time to think like a scientist!
Ask your young scientists…
- What do you think will happen with the cups?
- Why do you think we left some cups empty?
- What do you know about primary colors?
- How do you think what you know about primary colors (that they make secondary colors) will come into play in this experiment?
- What do you notice is already happening with the paper towel pieces and the water?
Feel free to have your scientists write or draw what they are seeing!
This experiment will take awhile to completely finish and make the rainbow design. It’s a good idea to either do this experiment at night before bedtime, make some predictions, and then wake up and see the walking water rainbow. You could also do this experiment first thing in the morning and then watch it change all day long!
Have fun making a walking rainbow and thinking like scientists!
Wacky Art: Tin Foil Printmaking
By Meredith Brustlin, CMNH Educator
This printmaking is so fun and easy to do with materials you probably already have at home! The best part is it can be done over and over again with very little clean-up in between! Here’s how to get started:
Materials Needed:
- Piece of paperboard (like a cereal box) or cardboard, slightly bigger than an average piece of paper (10in X 12in-ish)
- Piece of aluminum foil that is large enough to cover the paper/cardboard. If needed, you can use two seperate pieces to cover the board
- Tape
- Acrylic or tempera paint
- Cardstock, printer, or construction paper
- A paintbrush
- Q-tips
- Paper towels or old kitchen rags
Directions (prep):
- Make your printing board
- Cut your piece of paper/cardboard to the appropriate size
- Cover with aluminum foil
- Fold the foil over the piece of cardboard and tape on the back so it does not move around
- Prep/gather paint, brushes, q-tips, paper towels, etc
Directions (activity):
- Drizzle a small amount of paint onto your printing board
- NOTE: Start with quite a small amount, you do not want too much paint on there for this activity--you can always add a bit more!
- Use the paintbrush to spread it out across the printboard so it is completely covered
- Use q-tips to quickly draw designs and pictures directly into the paint
- NOTE: Do this fast! Since you are using such a small amount of paint, it will dry quickly
- Place a piece of paper onto the painted printboard and gently press down
- Peel away to reveal your print!
- Use a damp paper towel to clean your printboard, dry it off, and try again!
