The Museum Blog
Category: Learning
Tinker Time: All About Spring!
by Meredith Brustlin, CMNH Educator
Sorting:
- Place a variety of colors of plastic eggs in a container
- Place pieces of colored paper, or paper with a color drawn on them, around the container
- Invite little ones to sort them by color!
- Want an extra challenge? Try making some plastic egg patterns!
Cause & Effect:
- Find something to make a ramp
- I used a 3-ring binder, but you could find a piece of wood, cookie sheet, or piece of flat cardboard
- Collect a few books to add to the ramp and give it some additional height
- Find a car or two
- I tied a tiny bunny stuffed animal to my car--this is fun, but not necessary!
- Gather a variety of different textured materials
- Tin foil, bubble wrap, felt, sandpaper, etc.
- Invite little ones to experiment with the ramp!
- Try racing the car down the ramp without any texture on it
- Add different textures and see how the movement of the car changes
- Add some height to the ramp and try again with the different textures
- Ask questions!
- What is happening?
- How does the movement of the car change?
- Why do you think it changes?
- What else could we add/change?
Sensory:
- Gather a bunch of plastic eggs
- Fill up the eggs with a variety of materials
- Unpopped popcorn, coins, buttons, paper clips, etc
- As an extra precaution, you could put a small piece of tape to keep the eggs closed during investigation!
- Make sure each egg has a sound match, aka two eggs of each sound
- Invite little ones to try and match the sounds!
Art:
- Find a paper towel tube
- Cut it into three pieces
- Leave one piece a circle
- Smoosh the other two pieces to make ovals
- Use the paper pieces to make a bunny stamp!
Shiny Penny Experiment
By Colie Haahr, CMNH Educator
We were surprised by how excited kids got about cleaning pennies when we offered this experiment as a drop in STEAM activity at CMNH! It does seem like a magic trick when you first see the pennies getting shinier almost instantly.
This experiment is a good way to practice making predictions and observations, and it’s an easy one to do with materials that are available at home! For kids learning about money and currency, this is a great way to practice counting and recognizing the different coins as well.
Materials:
- Table cover of some kind (a trash bag works!)
- Several pennies
- Other coins- quarter, nickel, dime, coins from other countries if available
- Vinegar
- Salt
- Bowl of water
- Bowl for vinegar and salt mixture
- Q-tips
- Paper towels
- Optional: lemon juice, soapy water, other liquids you would like to experiment with
Directions:
- One way to set this experiment up is to use a muffin tin or small bowls to offer several different liquids for kids to try. A small pallet for paint works well, too!
- Put the coins on a surface you do not mind getting messy- plastic plate, paper towel, or directly on the table covering, but you will want some paper towels or dish towels nearby
- Allow kids to experiment with the materials to see what would work best to clean the different coins by dipping the coins in the liquid, and brushing them with a q-tip
- Ask what they think will work best, and why?
- After some experimentation, guide them toward the vinegar or lemon juice mixed with salt. The salt works as a mild abrasive, and the acid in the vinegar and lemon juice react with the pennies to make them shiny and new looking
- Important: rinse the pennies in water after cleaning them if you would like to keep them nice and shiny! They will oxidize and turn green otherwise.
- Fun fact: this is what happened to the statue of liberty, and why it looks green today! Kids did not dip it into a bowl of vinegar, but the statue is copper, and it turned green because of oxidation over time.
- Ask why the acidic liquids cleaned the pennies, but not the other coins? What is different about them? The pennies are a different color because they are made of a different material: copper!
What’s Happening?
Pennies are made of copper, and copper is shiny, but over time it becomes tarnished and appears black or brown because of copper oxide, which is created when copper bonds with oxygen. Acids mixed with salt help break down the copper oxide on the penny. Vinegar may remove actual dirt from the pennies and other coins because it works well as a cleaner!
Extensions:
Science Bob offers a few more experiments you can try using the same materials.
Scientific American offers some ideas for different liquids to use, and a more in depth explanation and method for advanced experiment-ers.
Ice Exploration!
By Meredith Brustlin, CMNH Educator
Materials Needed:
- Bowl(s) or container(s) that are freezer safe
- Fun items/trinkets to freeze (small plastic toys, rocks, coins, etc)
- Food coloring (optional, if you want colorful ice)
- Spray bottle
- Salt
Directions (prep):
- Collect small trinkets and items from around the house and place them in a bowl or container
- Fill the bowl or container with water
- Add food coloring, if desired
- Freeze at least overnight (depending on the size of your container)
- Fill a spray bottle with water & a few spoonfuls of salt, shake!
Directions (activity):
- Take the container out of the freezer and turn it upside down on a cookie sheet, tray, or large dish
- Once the ice has unstuck from the container, remove the container and invite your young scientists to play!
- Direct them to spray the ice with the spray bottle. You can also have some other salt available that they can use to help melt the ice.
- Try to free some of the trinkets!
The Science:
- There are so many angles that you can take for discussing the science of this project.
- The water: it changes from a liquid to a solid when we put it in the freezer! While you melt the ice with the salt water, it changes back into a liquid again! That’s two states of matter, can it become a gas? (Yes! Water vapor!)
- The melting: Salt lowers the freezing point of water. Ice melts faster when salt is added as the salt lowers the freezing point of the ice, this is known as freezing point depression. The more salt you add the lower the freezing point. This is why we use salt on roads in the winter to help melt the ice and make them safe!
The following Wee Ones video is designed for preschoolers and is all about "Melting" and would make a good video to watch together while doing this experiment!
Make a Bird Kite!
by Meredith Brustlin, CMNH Educator
The craft I have to share with you today is making a bird kite! This is a really simple activity that you can do with a handful of household items - and it will (hopefully) supply your little ones with a whole bunch of fun.
This awesome activity was found on www.krokotak.com - browse their website for a variety of other fun activities that use simple materials you can find at home, mostly paper!
Materials Needed:
- Piece of 8.5 X 11 paper
- 2-3 Sticky notes
- Or pieces of colorful scrap paper and a glue stick or tape, I like the sticky notes because they are self adhesive!
- Stapler, scissors, hole punch
- Markers, stickers, any other decorations you’d like
- String/ribbon/yarn
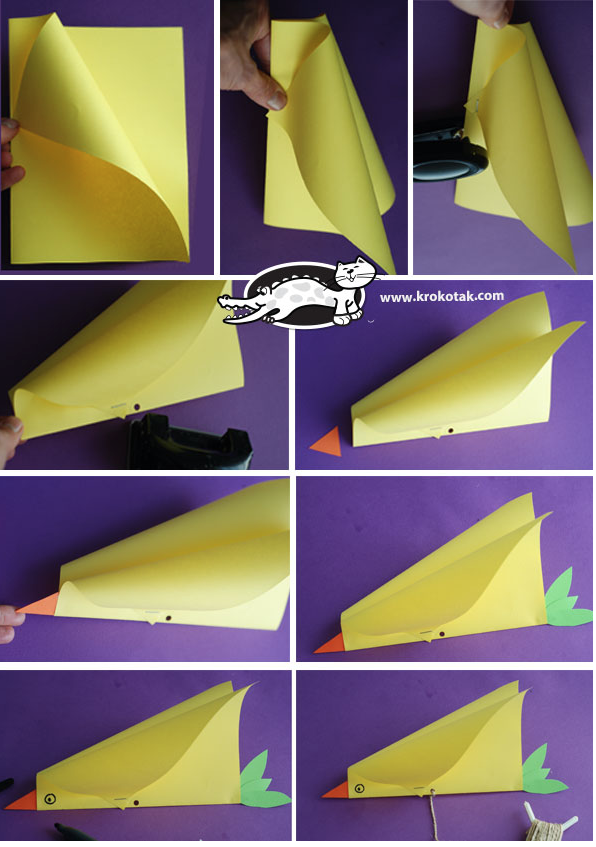
Instructions:
- Fold a piece of paper in half
- Gently “swoop” down both sides to form the wings of your bird and attach with one staple
- Punch a hole on the bottom for the kite string
- Cut a sticky note to make a beak and tail feathers--feel free to add other decoration using markers
- Add some sticker eyes
- Attach the string - you’re ready to fly!
Tinker Time at Home
by Meredith Brustlin, CMNH Educator
Sorting: Exploring playing cards
- Find a deck of playing cards and spread them out
- Raid your recycling bin and find 2-4 containers (depending on child’s age, see below) and cut slits in the top so the cards can be dropped inside.
- I used large clear plastic baby spinach/mixed greens containers for this.
- Some children will just have fun putting the cards into the slots - and that’s okay!
- Younger children can sort them by color (2 containers)
- Older children could sort them by their suit! (4 containers)
- Invite your child to sort the cards!
Art: Evaporation Science Art
- Find a plastic container and a paintbrush
- The paintbrush should be one you don’t mind getting a bit dirty!
- Fill the plastic container with water and go outside!
- Paint designs on your driveway/sidewalk using the water
- Watch and see how long it takes the drawings to evaporate
- This activity is best done on a sunny day :)
Sensory: Floating splashy transfer
- Put out two mixing bowls
- Fill both with water
- Put items that float in one bowl
- I used marker caps
- Invite your child to use a spoon or scoop to move all of the items from one bowl to the other!
- You could put items that sink and float in the bowl and chat about how moving them is different if they sink or float.
Building: Recycling Bin Wonders
- Raid your recycling bin and find a variety of items
- Use them to build!
- Give your child prompts like “Make a bridge!” “Make a house!” “Design a rocketship!” and challenge them to just use the items from the recycling bin
- It’s fun to add little toys or other manipulatives to this challenge
Polymer Science MAGIC!
Materials Needed:
- Large mixing bowl or container (a casserole pan would work!)
- Plastic bag (I recommend quart size) filled ¾ of the way with water
- A bunch of pencils or colored pencils--the sharper the better!
Directions (prep):
- Fill your plastic bag ¾ of the way with water
- You may want to fill a few because this experiment is very fun!
- Sharpen your pencils
- Prep the activity area with the bowl or casserole pan
Directions (activity):
- Ask your young scientists if they think you can poke a pencil through a bag of water without spilling a drop (they will probably say “No way!”)
- Hold the bag up over the bowl or other container
- Carefully twist a pencil through one side of the plastic bag and then continue to twist through the other side
- No water will spill!
- Try it with the other pencils
Invite your young scientists to try on their own using bags of water and pencils
The Science:
- Plastic bags are made of something called a polymer
- Polymers have long strings of molecules that are flexible
- When you poke the pencil through the plastic bag, it wiggles in between these strings of molecules and the molecules seal up around the pencil so that no water is spilled!
Extend the learning:
- Spend some time looking on the internet for other household items that are polymers - you’ll be surprised by what you find!
Baby Storytime: Songs & Rhymes about Food!
by Meredith Brustlin, CMNH Educator
This week, I shared some of my favorite songs and rhymes all about food! Here they are so you can follow along and keep singing all week long!
Hello Song:
Hello it’s time to play
Let’s have some fun today!
Let’s clap our hands
And wiggle our toes
A hug...and a kiss...and away we go!
Hello (insert name here) it’s time to play
We’ll have so much fun...hooray!
Open Them/Shut Them (action song)
Open them, shut them
Open them, shut them
Give a little clap-clap-clap
Open them, shut them
Open them, shut them
Lay them in your lap-lap-lap
Creep them, creep them, creep them, creep them
Right up to your chin-chin-chin
Open up your little mouth…
But do not let them in!
Popcorn! (bounce)
Popcorn, popcorn, sizzling in the pan
Shake it up, shake it up
Bam! Bam! Bam!
Popcorn, popcorn, now it’s getting hot
Shake it up, shake it up
Pop! Pop! Pop!
Sugar Babies (action rhyme)
Roll, roll, sugar babies
Roll, roll, sugar babies
Push! Pull! Clap, clap, clap!
Roll, roll, sugar babies
Roll, roll, sugar babies
Hug! Kiss! Clap, clap, clap
Roll, roll, sugar babies
Roll, roll, sugar babies
Up! Down! Clap, clap, clap
NOTE: Feel free to add more opposites and keep this rhyme going for awhile!
SECOND NOTE: I realized (while recording this video) that Hug & Kiss are, in fact, NOT opposites, but it was too late to change them--this was a leftover edit from Valentine’s Day!
Apple Tree (action rhyme)
Way up high in an apple tree,
Two little apples smiled at me!
I shook that tree as hard as I could,
Boom! Down came the apples…
Yum! They were good!
NOTE: Feel free to change the words to this rhyme to reflect your child’s favorite foods! Way up high in a cupcake tree, anyone?! (Yes please!)
Shake Your Shaker! (prop song)
If you’re happy and you know it, shake your shaker--one time!
If you’re happy and you know it, shake your shaker--two times!
If you’re happy and you know it, and you really want to show it
If you’re happy and you know it, shake your shaker...three times!
If you’re happy and you know it, shake your shaker...four times!
If you’re happy and you know it, shake your shaker...five times!
If you’re happy and you know it, and you really want to show it
If you’re happy and you know it, shake your shaker!!!
NOTE: You can make your own shaker at home! I used an empty ibuprofen bottle and put some popcorn kernels inside - I like this option because it has the child safety lock top. You could also put popcorn kernels or beans inside a plastic egg and tape the egg shut!
Give a Shake, Tap, Clap! (prop song)
If you’re happy and you know it...give a shake, shake, shake!
If you’re happy and you know it...give a shake, shake, shake!
If you’re happy and you know it and you really want to show it
If you’re happy and you know it...give a shake, shake, shake!
If you’re happy and you know it...give a tap, tap, tap!
If you’re happy and you know it...give a tap, tap, tap!
If you’re happy and you know it and you really want to show it
If you’re happy and you know it...give a tap, tap, tap!
If you’re happy and you know it...give a clap, clap, clap!
If you’re happy and you know it...give a clap, clap, clap!
If you’re happy and you know it and you really want to show it
If you’re happy and you know it...give a clap, clap, clap!
Goodbye Rhyme (action rhyme)
This is big, big, big
And this is small, small, small
This is short, short, short
And this is tall, tall, tall!
This is fast, fast, fast
And this is slow, slow, slow
This is yes, yes, yes
And this is no, no, no
This is hi, hi, hi
And this is bye, bye, bye!
Two Ingredient Snow Dough
By Colie Hahr, CMNH Educator
Our most popular drop-in STEAM activities at CMNH seem to involve making messy mixtures! From slime, to dough, to puffy paint most kids love getting their hands a little dirty, and enjoying a sensory experience while they play and create.
One of the easiest make-at-home messy projects is two ingredient snow dough. It’s part science experiment and part sensory play, and honestly just a bit messy compared to the wild world of slime!
Materials:
- Table cover of some kind (a trash bag works!)
- Corn Starch
- Hair conditioner -white works well
- Mixing bowl
- Measuring cups
- Mixing spoon
- Optional: food coloring, cookie cutters, placemat or tray for play, playdough accessories
Dough recipe: this dough has a one to two ratio of liquid to solid ingredients, so it is easy to double or halve the recipe:
Ingredients:
2 cups cornstarch
1 cup inexpensive hair conditioner
Food coloring (optional)
Directions:
- Add the food coloring (optional) to the conditioner, then mix in a large bowl.
- Add the cornstarch to the bowl and mix thoroughly. Kids can take turns mixing. Keep mixing with a spoon until the consistency seems like playdough
- If the mixture is too wet, add corn starch, and too dry add a little more conditioner. Avoid handling the dough until it looks nice and smooth- this will help contain the mess in the bowl until it is ready to be handled.
- Play with the dough using cookie cutters, stamps, small figurines, or other manipulatives of your choice. It is washable from most surfaces, but kids should be supervised as they would with playdough
What Happened? Once the dough is mixed together, a whole new material has been created, however, the reaction is complicated because the conditioner includes several mixtures and solutions in its ingredients. A mixture is when two substances are mixed together, but you can separate them back into their individual parts. Trail mix is a good example of a mixture. A solution is a substance where you mix ingredients together, and it’s not possible to separate them. Hot Cocoa is an example kids may understand: once you mix hot cocoa powder with milk or water, can you turn it back into milk or water again?
For this activity, you mixed together two different ingredients to make something new. The corn starch is a solid, even though it is a very fine powder. It’s similar to the shape, size, and texture of sand, so making this comparison may be helpful for kids to understand that something can be solid, but also be made of very small parts. Corn starch is used to help make things thicker for cooking, and it also helped to make the dough thicker and more solid.
The other ingredient is hair conditioner, which is a liquid even though it is very thick. The conditioner helped to make the dough softer and easier to mold. The dough you created is still a solid, but it is able to be sculpted and shaped! The ratio of conditioner to corn starch is what made the dough work. This recipe used a 2 to 1 ratio, so there was twice as much cornstarch as conditioner. Older kids can work on fractions, adding, measuring, and dividing as part of this project.
One way to explain this experiment to kids is to ask them to think about making a cake. When you mix all of the ingredients together to make a cake, the ingredients go through a physical change and create a mixture. When the cake goes into the oven to bake, a chemical change takes place, and the batter mixture turns from liquid into a solid baked cake. It would not be possible to take the eggs, flour, or milk back out of the cake once it is cooked, and that’s part of what makes it a chemical change rather than a physical change. For matter to change, usually something needs to be added such as heat or pressure. We didn’t add heat or pressure for this experiment, so even though the dough was very different from the two ingredients that we put together to make it, it is still a physical change. We did not cook it like a cake, AND it’s not edible, so don’t eat it!
Physical Change: A physical change is a type of change in which the form of matter is altered but one substance is not transformed into another. For example, folding paper to make an origami crane changes the shape and size of the paper, but it is still paper.
Chemical Change: A chemical change is any change that causes a new substance to be formed. For example, if an origami crane were to catch fire and burn, the paper would turn into ashes, a new substance.
Mixture: A substance made by mixing other substances together. For example, trail mix.
Storage: The dough should last for about a month if it’s sealed up in a container. Add a little water to the dough if it dries out, and it will last longer.