About Your Membership
By Leila McRae, Bookings & Membership Manager
When we closed our doors in March we had hoped that we would only be closed for a few weeks. Certainly, we did not anticipate being closed for months and not being able to welcome you to the museum for an extended period.
In light of our closure we will be extending all current memberships for however many months we are closed from their expiration date. All memberships will be updated in our database with the new expiration dates and members will be issued an updated expiration date sticker to add to their current membership card.
We cannot wait to welcome you back to the museum when it is sure to be a safe and fun visit for all of our guests and staff. We miss seeing you, hearing your laughs, learning with you and sharing stories and enjoying our days with you.
In the meantime, please visit our Online Learning & Fun page to stay connected with the Children’s Museum of New Hampshire through a number of virtual activities, and follow us on Facebook to stay in touch and learn about members-only opportunities when we reopen.
Wacky Art: Windsock Craft
By Meredith Brustlin, CMNH Educator
I love this windsock craft! It’s an art project that is accessible to all ages and abilities - and you get to sneak in a little bit of science. Here’s how to make your own windsock:
Materials Needed:
- Paper (printer paper, cardstock, construction paper, etc)
- Markers or crayons
- Crepe paper streamers or tissue paper cut into long strips
- Tape or glue
- A stapler
- A hole punch or scissors
- String or yarn
Directions:
- Invite little ones to decorate their piece of paper with the markers or crayons. If you have stickers or stamps, you could use those, too!
- Once their paper is all decorated, flip it over so that you are looking at the back
- Tape or glue the streamers onto the bottom end of the paper
- If you used glue, give it a few minutes to dry
- Pick up the paper and curl it into a tube/windsock shape
- Staple on the top and the bottom
- Hole punch or cut small holes on either side of the top
- Put your string through the holes
- Hang up your windsock!
The Science:
- The science behind windsocks is pretty simple...if you put your windsock outside, you’ll be able to tell a few things:
- If the wind is blowing
- How much the wind is blowing
- Which direction the wind is coming from!
First Friends at Home: Things that FLY
By Meredith Brustlin, CMNH Educator
This week’s First Friends Friday was all about things that can FLY! We did a bunch of rhymes about bugs, insects, and birds!
Hello Song:
Hello it’s time to play
Let’s have some fun today!
Let’s clap our hands
And wiggle our toes
A hug...and a kiss...and away we go!
Hello (insert name here) it’s time to play
We’ll have so much fun...hooray!
Open Them/Shut Them (action song)
Open them, shut them
Open them, shut them
Give a little clap-clap-clap
Open them, shut them
Open them, shut them
Lay them in your lap-lap-lap
Creep them, creep them, creep them, creep them
Right up to your chin-chin-chin
Open up your little mouth…
But do not let them in!
Cuckoo Clock (Action Rhyme/Bounce)
(Rock babies back and forth and then bounce them up in the air for each cuckoo)
Tick-tock, tick-tock
I’m a little cuckoo clock!
Tick-tock, tick-tock
It’s one o’clock…
Cuckoo!
Tick-tock, tick-tock
I’m a little cuckoo clock!
Tick-tock, tick-tock
It’s two o’clock…
Cuckoo! Cuckoo!
It’s three o’clock…
It’s four o’clock…
Etc!
Beehive (action rhyme)
Here is the beehive
But where are the bees?
Hiding inside where nobody sees!
Soon they’ll come buzzing out of the hive…
One! Two! Three! Four! Five!
Buzzzzzzzzzz!
I’m a little Blue Jay (bounce)
I’m a little Robin and I wiggle all day
If you get too close to me I’ll FLY away!
I’m a little Blue Jay and I wiggle all day
If you get too close to me I’ll FLY away!
I’m a little Chickadee and I wiggle all day
If you get too close to me I’ll FLY away!
I’m a little Cardinal and I wiggle all day
If you get too close to me I’ll FLY away!
Wise Old Owl (action rhyme)
There is a wise old owl,
With a pointed nose,
He has pointed ears,
And claws for toes!
He sits in a tree,
And looks at you,
Then he flaps his wings and says:
Whoooooo! Whoooooo!
Everyone can shake! (prop song)
Everyone can shake shake shake
Everyone can shake shake shake
Everyone can shake shake shake
And now it’s time to stop!
Everyone can tap tap tap
Everyone can tap tap tap
Everyone can tap tap tap
And now it’s time to stop!
Everyone can clap clap clap
Everyone can clap clap clap
Everyone can clap clap clap
And now it’s time to stop!
Everyone can wave, wave, wave
Everyone can wave, wave, wave
Everyone can wave, wave, wave
And now it’s time to stop!
Goodbye Rhyme (action rhyme)
This is big, big, big
And this is small, small, small
This is short, short, short
And this is tall, tall, tall!
This is fast, fast, fast
And this is slow, slow, slow
This is yes, yes, yes
And this is no, no, no
This is hi, hi, hi
And this is bye, bye, bye!
Pete the Cat Party- Painting Guessing Game
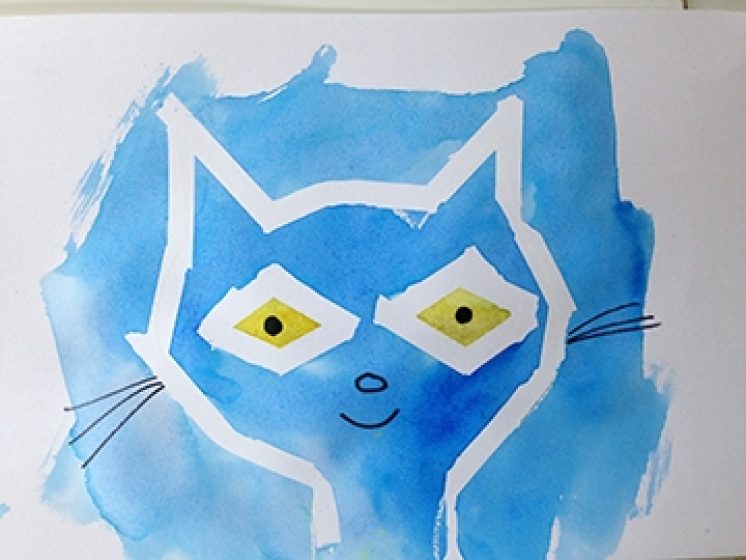
By Colie Haahr, CMNH Educator
Thank you for checking out our Pete the Cat Party video! If you followed along with the storytime, you know that Pete the Cat LOVES his white shoes, and his red shoes, and his blue shoes! He is even okay with his wet shoes! This blog post will walk you through setting up an art project guessing game, where kids can guess what Pete stepped in to change the color of his shoes.
Materials:
- Paper- cardstock, construction paper, sketch paper
- Watercolor paints
- Paint brush
- Water cup
- White crayon
- Drawings prepped ahead
Directions:
Prep Ahead: For this project, you will need to draw some pictures with a white crayon ahead of time. Each drawing should be an item that is mostly one color, and that we can imagine might change the color of Pete’s shoes. Here are some ideas:
- Green: Spinach, Peas, Avocado
- Blue: Blueberries
- Purple: blackberries, grapes
- Red: Strawberries, Raspberries, Cherries
- Orange: Oranges, Carrots
- Yellow: Buttercups or Dandelions
- Brown: Coffee, Chocolate Cake
- Black: Olives
- Draw a picture of each item on a piece of paper using a white crayon
- Set up the water colors, paintbrush, and water cup for painting
- Play the game! Ask, “what do you think Pete the Cat could step in to change his shoes a different color?” Take a few guesses.
- Now, choose one color and paint one of the pieces of paper, and see what happens! The picture you made with the crayon should magically appear
- The white crayon creates a wax resist, so the watercolors will not soak into the paper, and you can see the drawing in white.
- You can give away what color to paint each item, for example, “try painting this one red, and guess what is in the picture,” or let kids choose a color, and then ask “Is that what color strawberries are, or are they a different color?”
- Play the game for each picture you made ahead of time.
Optional: kids can try coloring with white crayons to create a wax resist, then painting over it.
Optional: you can also do this activity using tape to create an outline of Pete the Cat, and paint over it, then take the tape off when the painting is dry to see the design.
Marching to Your Own Beat: Books for Cool Kids & Parents
by Taylore Kelly, CMNH Graphic Designer and Communications Specialist
If you and your children march to the beat of a different drummer, have we got a list of picture books for you. After much research and a lot of fun, we came up with ten books that speak to the modern inner rebel, artist, musician, and trickster. Each story is filled with messages for big and small people and poignant art.
My Dad Used to Be So Cool, by Keith Negley
This is a very thought-provoking, moving book about a boy who sees hints of his father’s former life. Rock-bands and motorcycles! Who knew Dad used to be so cool!? The story is combined with many colorful and vibrant illustrations and will resonate with all, the young, the middle, and the old(er).
Urban Babies Wear Black, by Nathalie Dion
First off this book has amazing, stylish art by Nathalie Dion. The truth MAY be that no child will REALLY identify with this book in words, however if parents enjoy reading this board book, the baby will appreciate the effort. The message may appear to be that urban babies do all sorts of cool things, but what comes across is that the babies in this book do things with their parents, and that's what makes them the coolest!
Tell Me a Tattoo Story, by Alison McGhee & Elizabeth Wheeler
This is a beautiful story about a father sharing his life stories, and memories with his son. But instead of flipping through a photo album together, we see his life and loves come alive in his description of his tattoos - a statement of family love. It dispels the myth that only certain types of people have tattoos. It’s a love story you won’t regret reading.
What is Punk, by Eric Morse and Anny Yi
This little diddy is a pop-culture primer. The history of punk rock is told in clever rhyming that will delight little readers and amuse parents. Anny Yi's phenomenal 3D-clay illustrations are pure perfection and bring this world to life. Readers of all ages will have so much fun. You can read this in less than 5 minutes, to your child and, maybe, play the music! Teach 'em young!
Where's Warhol, by Catharine Ingram and Andrew Rae
This beautiful and fun book shares art history and pop culture! Instead of trying to spot "Waldo" you get to try to spot Warhol and friends. In the process, discover figures such as artist Rachel Whiteread, potter Josiah Wedgwood, novelist Gustave Flaubert and architect/designer Walter Gropius who appear alongside the likes of rappers The Beastie Boys, actor John Travolta, singer Madonna, and even Yoko Ono and John Lennon!
The Book With No Pictures by B.J. Novak
If there is one thing kids like even better than pictures, it’s nonsense words. Hearing nonsense words read aloud by your parents is top tier! We had a hard time not collapsing into fits of giggles and barely made it past “a hippo named Boo Boo Butt”.
Goodnight Darth Vader, by Jeffrey Brown
There are really no words actually needed to describe this book, BUT this whimsical bed time romp through everyone’s favorite space fantasy highlight’s superb artistic talents & goofy sensibilities. This makes a great bedtime treat for any Star Wars devotee.
Goodnight iPad: a Parody for the Next Generation, by Ann Droyd
This short, sweet book highlights our dependence on technology and the usefulness of knowing when to put it down. This closely follows the cadence, rhyme, and illustrated scene sequencing of the original "Goodnight Moon", by Margaret Wise Brown. However, it makes serious fun of our addictions to bright, noisy, digital media. This book will hit a home run with parents of school-aged kids today!
Triangle, by Mac Barnett and Jon Klasen
This book brings a quirky, clever tale to life. It’s a silly story about friends playing tricks on each other. A truly fun and simple story that will connect with kids, but also have adults smiling at the antics and conclusion.
Beware of the Frog, by William Bee
A great picture book for older kids perhaps as this story starts out very sweet, but has some twists along the way and a surprise ending! It’s the twists and turns that make this story great! A perfect blend of sweet and funny. Great illustrations and a hiding snail to find on each page!
Backyard Birding- Make a Bird Feeder
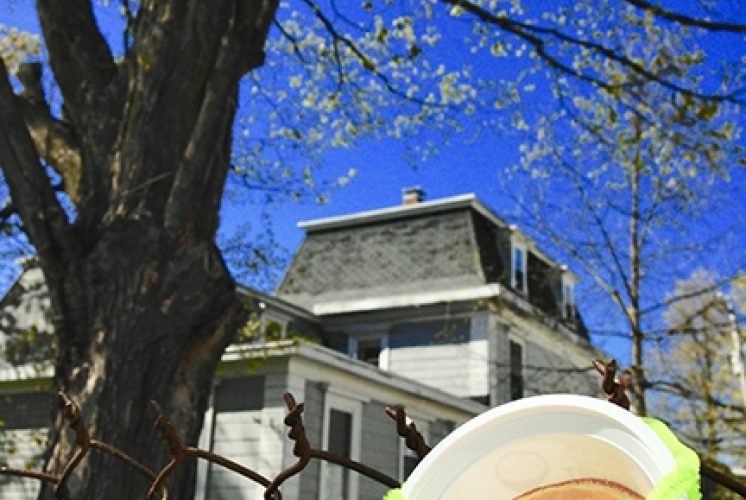
By Colie Haahr, CMNH Educator
Backyard birding is a great way for kids to practice making observations, and to learn about ecology and biology! Learn how to make 2 easy bird feeders to attract special birds to your yard, especially Orioles, who like oranges and other fruits.
If you have not tried backyard birding before, there are a few things to think about before you start. First, setting expectations for seeing birds. Even if you do a great job setting up a feeder with food that birds like, you may not see birds right away, or draw in unique birds right away. It’s a good idea to let kids know they may not see birds as soon as the feeder goes out. When scientists do research, they do a lot of observation and patient waiting to see results!
The food you provide is important, too, and birds need water! It may take some time to establish your backyard as a consistent food source for birds, so don’t give up if birds do not appear right away. All animals need water, so if you are able to provide clean water for your backyard animal friends, then you may see more of them more often. Birds do not have hands, obviously, so they use their beaks for many different things the way we use our hands. Different birds have different beaks that are adapted to where they live and what they eat. There’s a great book called Beaks! by Sneed B. Collard III that helps to illustrate this to kids. When you put out food for the birds keep in mind not only what they eat, but how they eat it and whether they can access it with their beaks.
Something else to keep in mind is the season. Some birds are only going to be around for a few months of the year because of migration, and others will be around throughout the year. Some birds migrate, or move, to warmer areas for the winter so that they can find more food. Migrating is a behavioral adaptation, or change in behavior, that helps an animal to survive. Some foods are harder for birds to find in the winter, like insects and fruits. The temperature gets too cold for some birds, but surprisingly many birds can withstand very cold winter temperatures. Spring is a great time to observe birds, and you may even get to see some nests being built.
Location is important, too. If there is not a lot of natural habitat near your backyard, you may see fewer bird species. To see “new” or special birds, you can try visiting their habitat, like a local conservation area. The Bellamy Preserve in Dover is a great place to see birds, and since there are open fields as well as the bay nearby, you can see shore birds and forest birds on the same trip. Ideal bird habitats may also be ideal tick habitats, so be mindful of your clothing choices, and in the springtime boots will be necessary for the mud.
Finally, bird identification can be really tricky even for grown ups! Instead of focusing strictly on bird identification, try setting up an observation chart that kids can use independently. This chart can include the day, time, number of birds, and what the bird was doing. For example, at lunch time Sally Scientist saw one bird that was hopping, and three birds that were flying. She didn’t see any birds that were eating or drinking, so they must not have known it was lunch time. All silliness aside, noticing whether animals eat when people eat is a great observation! A chart that kids can check off might work well:
Sally Scientist’s Observations:
Day/Time | Birds Hopping | Birds Flying | Birds Eating | Birds Drinking |
Monday lunch | / | /// | 0 | 0 |
Making the Bird Feeders:
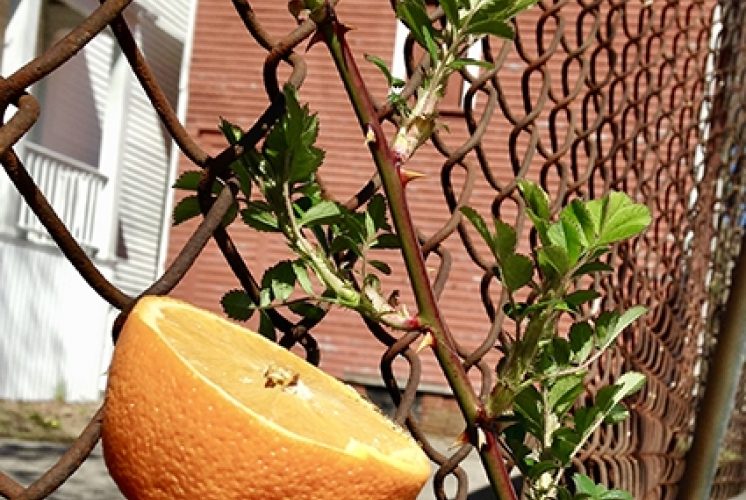
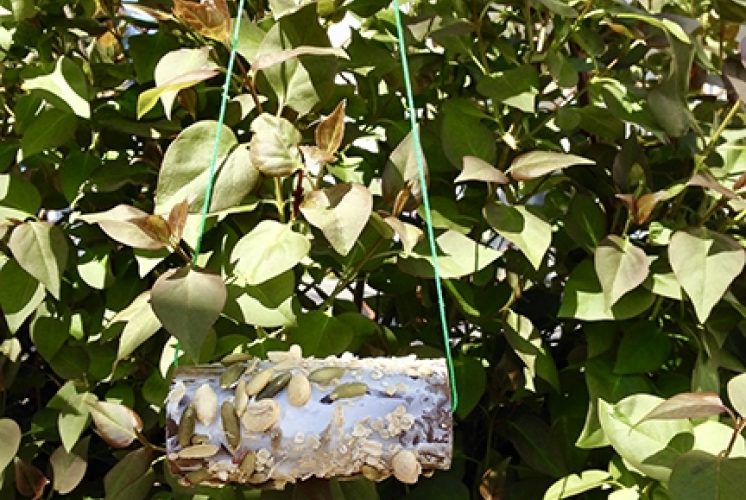
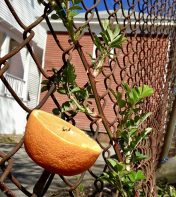
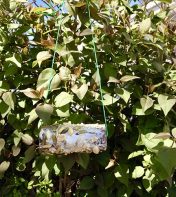
In the video you will see 2 different ways to make a bird feeder. One style of feeder is made by adding seeds to a paper towel roll or a pine cone, and it is a little messy, but can be done outdoors to cut down on spills. The second style of feeder is made by using an orange as the food rather than bird seed, and this is done to attract Orioles because they like to eat fruit. This can be done by carefully attaching an orange half to a branch, or creating a small feeder that fits an orange inside of it, and has a perch for the birds to sit on while they eat.
Materials Needed:
- Oranges
- Seeds
- Paper towel tube
- Peanut butter, sun butter or crisco
- String
- Pipe cleaners
- Hole punch
- Small jar or yogurt cup
- Stick for a perch (sturdy)
- Optional: jelly - this can be messy, and less messy oranges work well!
Directions:
- Tube Feeder: The first feeder design is simple, but can be a little messy. For this feeder, you will need nut butter or crisco, a paper towel tube, string, and bird seed
- Use a tray or plate to hold the bird seed (a small mound should work)
- Cut a paper towel tub in half so that one tube makes two feeders
- Carefully add nut butter or crisco to the outside of the paper towel tube.
- Once the tube is mostly covered, gently roll it in the birdseed. The birdseed will stick to the tube, but keep it on a work surface like a plate until it’s time to hang it up
- Use a string to hang up your feeder by threading it through the tub and tying the two ends in a knot. Hang your feeder up in a tree
- Orange Feeder: For this feeder, you need an orange cut in half, sticks, a container, hole punch, and string to hang it up. The orange feeder is designed to attract Orioles because they enjoy eating fruit, especially oranges! Orioles also like jelly (not jam), but it is a little stickier and messier, so we suggest trying oranges first.
- First, cut the orange in half so that the birds can get to it
- The easiest way to make an Oriole feeder with oranges is to use a sturdy branch and poke the orange half directly onto a tree
- Another method is to use a small container, like a yogurt cup, to hold the orange. Use a stick to add a perch, add holes with a hole puncher, and use a pipe cleaner or string to hang it up.
Links:
https://www.allaboutbirds.org/news/types-of-bird-seed-a-quick-guide/?pid=1142
https://www.audubon.org/news/make-orange-feeder-orioles
https://www.allaboutbirds.org/guide/Baltimore_Oriole/lifehistory
https://feederwatch.org/blog/one-peanut-can-go-a-long-way-for-a-carolina-wren/
First Friends at Home: Farm Animals
By Meredith Brustlin, CMNH Educator
This week featured songs & rhymes all about farm animals!
Hello Song:
Hello it’s time to play
Let’s have some fun today!
Let’s clap our hands
And wiggle our toes
A hug...and a kiss...and away we go!
Hello (insert name here) it’s time to play
We’ll have so much fun...hooray!
Open Them/Shut Them (action song)
Open them, shut them
Open them, shut them
Give a little clap-clap-clap
Open them, shut them
Open them, shut them
Lay them in your lap-lap-lap
Creep them, creep them, creep them, creep them
Right up to your chin-chin-chin
Open up your little mouth…
But do not let them in!
This is the way the ladies ride (bounce)
This is the way the ladies ride
Trit-trot, trit-trot
This is the way the gentlemen ride
Jiggity-jog, jiggity-jog
This is the way the farmer rides
Hobbildy-hoy, hobbildy-hoy
And this is the way the hunter rides
Gallopy, gallopy, gallopy, gallopy
Oooooooover the fence!
Five Clean & Dirty Pigs (action song)
Five pigs so squeaky clean
Cleanest you’ve ever seen
Wanted to go outside and play
Oink! Oink!
One jumped into the mud
Landed with a big thud
Then there were four squeaky clean pigs…
Four pigs…
Three pigs…
Two pigs…
One pig…
To Market, To Market (Bounce)
To market, to market to buy a fat pig
Home again, home again
Jiggity-Jig!
Buy a fat hog/ Jjiggity-Jog
Buy a fat cat/ Jiggity-Jat
Buy a fat sheep/ Jiggity-Jeep
Buy a fat hen/ Jiggity-Jen
Popcorn (prop song)
Popcorn, popcorn (Wave your scarf!)
Popcorn, popcorn
In the pot, in the pot (Hide your scarf in your hands)
Shake them, shake them, shake them (shake shake shake!)
Shake them, shake them, shake then
‘Til they pop! ‘Til they pop! (Throw scarf in the air!)
Scarf Peekaboo (prop song)
We wave our scarves together
We wave our scarves together
We wave our scarves together
Because it’s lots of fun!
We wave them up high!
We wave them down low
We wave them over you...peekaboo!
Because it’s lots of fun
We throw our scarves together
We throw our scarves together
We throw our scarves together
Because it’s lots of fun!
We throw them up high!
We throw them down low
We throw them over you...peekaboo!
Because it’s lots of fun!
Goodbye Rhyme (action rhyme)
This is big, big, big
And this is small, small, small
This is short, short, short
And this is tall, tall, tall!
This is fast, fast, fast
And this is slow, slow, slow
This is yes, yes, yes
And this is no, no, no
This is hi, hi, hi
And this is bye, bye, bye!
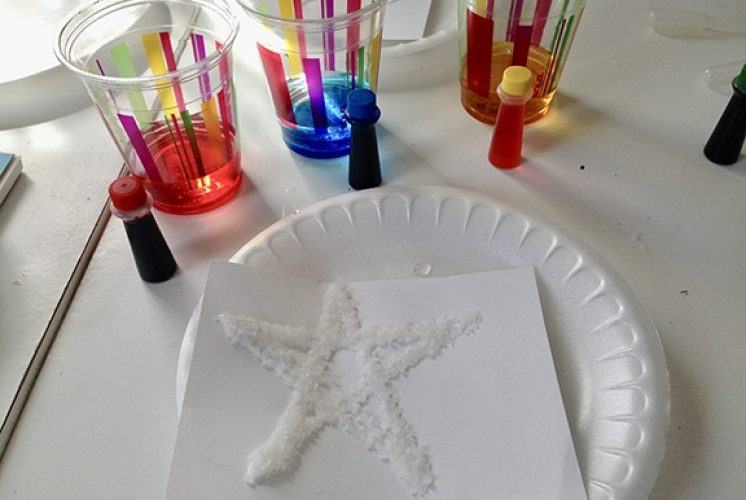
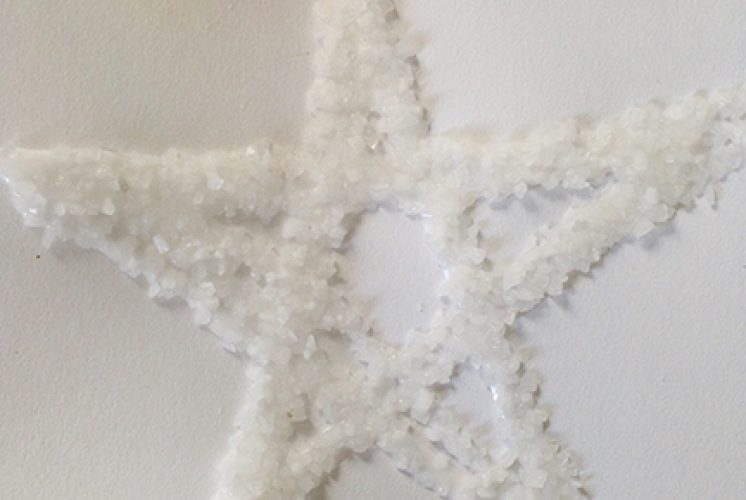
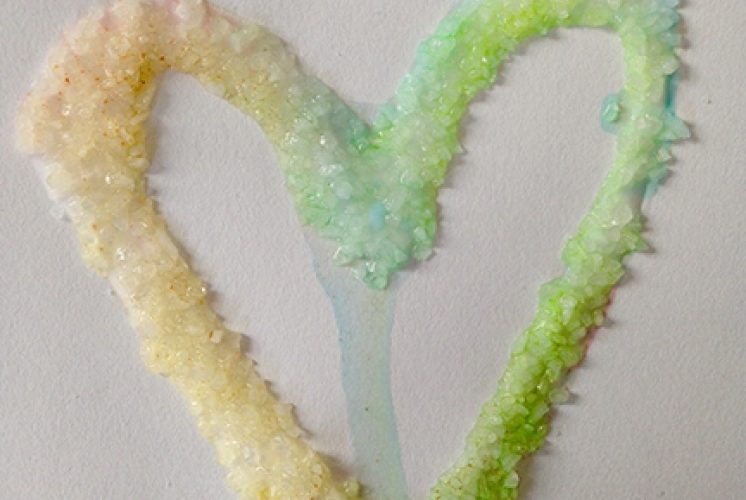
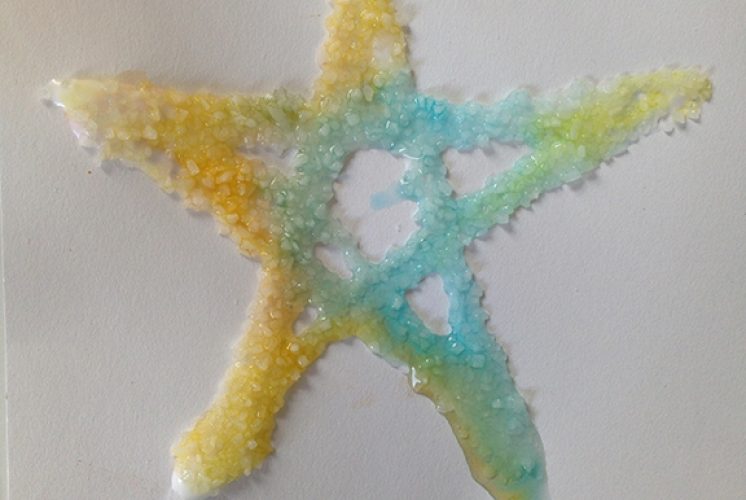
Wacky Art: Raised Salt Paintings
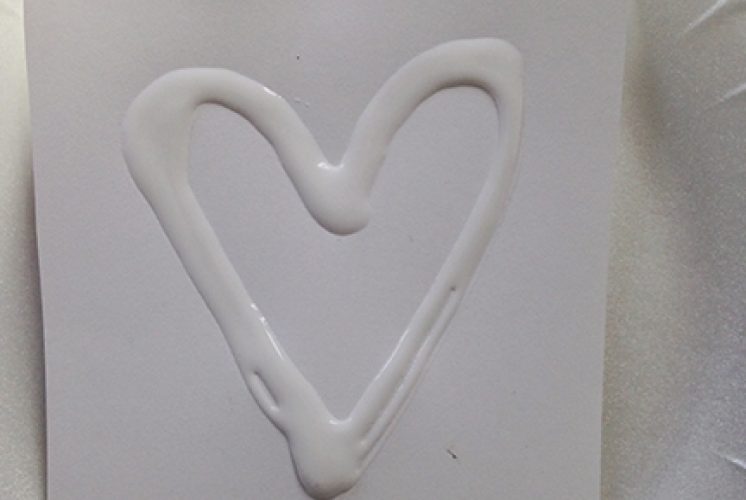
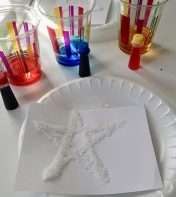
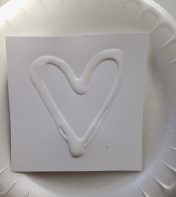
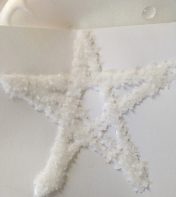
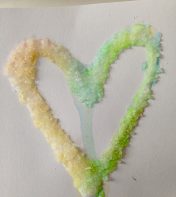
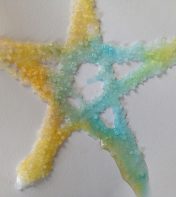
By Colie Haahr, CMNH Educator
This fun art project can double as a science project! Kids make designs with liquid glue, add salt, then carefully add some colors and watch what happens! The liquid water colors should be absorbed by the salt, and move along the glue and salt design right before your eyes!
Materials Needed:
- Card stock or thick paper, construction paper works
- Tray or plate work surface
- Salt in a dish with a spoon to scoop it
- Liquid glue - that kids can use on their own
- Liquid watercolors or food coloring mixed with water
- Pipette, eye dropper, or spoon
Directions:
- First, make a design on the cardstock using only glue- lines work well!
- Next, add salt to the glue so that the glue design is covered in salt. Gently pour the extra salt back onto your tray or into the trash. Similar to what you would do with glitter and glue- you want the salt covering all of the glue
- Use the pipette to carefully add colors to your design. Only add a little bit of color at a time so you can see the colors move. Only add color to the glue.
- The color should magically spread on your design as the salt absorbs the liquid
- Let your project lie flat to dry, otherwise the colors will spread where there is no glue!
Experiment:
- Here are a few ideas you can try to make this art project into an experiment:
- Try using different kinds of salt, and see which kind works best (larger or smaller grains). Make a prediction before you try each one!
- Try this project with sugar and with salt (use the same design for each), and see which works better, or if sugar works at all.
- Try color mixing by using primary colors to do the project. Can you get them to mix? Why or why not?
Links:
www.cbc.ca/parents/play/view/art-science-salt-glue-watercolour-experiment